Pages

 photo Home_zpspchzwjez.png  photo Patterns_zpsffe5v7nd.png  photo Tutorials_zpsplo1y0ea.png  photo 193faa8a-319f-4666-9915-a2cc9af19bda_zpsah1i88qv.png  photo 1aff47d5-9779-4086-ae8c-7c8a885b6c47_zpsyyyqf1xu.png
Showing posts with label Home Dec. Show all posts

Thursday, July 23, 2015

Cute Monogrammed Pillow!

I think she likes her pillow! A reader sent me this picture of her daughter with her monogrammed pillow - I love it! She picked out the fabric -- nice choices! Thanks for sharing Andrea!

Want to make one? Here's the free pattern - Primp My Pillow. I provide instructions, a link to the letters, and another link to help you make it zippered.


Tuesday, May 26, 2015

The Plush Pouf


I've seen poufs (floor cushions) popping up everywhere! Want to make one? I designed a pattern several years ago, then rewrote it for Shannon Fabrics (June 2013) - and made it out of their Cuddle fabric. It's about 17" tall with a 28" diameter and is filled with polystyrene beads.

What makes this pouf special? I created an inner pouf with a zippered closure so you can refill it with beads when it deflates a bit (which it will). And the outer pouf is more like a slip cover that you can change whenever you want!


I've written about it - part one, part two, and smaller foot stool


Here's my friend's cat on the smaller foot stool. I made this for her - her birthday is Flag Day!
And here's a smaller foot stool that is on my porch.


There are three zippers (one on the inner pouf and two on the outer pouf), so you need to be comfortable with sewing zippers. But they are worth every second it takes to make! BTW, I used some bean bag beans from Fairfield World. The smaller the diameter of the bead, the less they compress, so don't skimp.

Have fun!

Friday, January 9, 2015

The RIGHT Way to Measure/Hem Store-Bought Curtains!

Are you confused about how to hem/shorten store-bought curtains? Here's some help....


Here's the thing about store-bought curtains....most are NOT EVEN. Not remotely close to being even. Why is this a problem? If you rely on the seams and folds, your hemming will be off and your curtains will be uneven!

Here's the problem. It seems logical to measure from the top of the curtain to the floor. We take that measurement and add about 4" for the hem. What you'll end up with are some curtains that don't hang straight; the panels don't line up with each other.

Why? The curtains don't hang from the top. Most have grommets or a casing that the rod slides into. And that's the issue. Store-bought curtains, from my experience, have uneven hems or misplaced grommets. AND...the curtains rest on the rod at the casing or grommet top. 

I have been helping a friend settle into his new house. He purchased two curtain panels for his daughter's bedroom - she's got two windows: one wider than the other. There's a weird ledge, so they needed to be shortened - to almost half the length. His idea was that I could (1) shorten the two panels for the bigger window and (2) use the excess fabric to make another panel for the other window... Sure. We'll get to that in another post.

So we hung the curtains on the rod and I measured; I placed a pin at the appropriate length. I took the curtains home and laid them out on my table and measured:


But I didn't do this. Why? when I stacked the grommets on top of each other, they didn't line up. Some were closer to the top than others.

SO DON'T DO THIS or you'll have uneven curtains. Mine were up to a 1/2" off!!

DO THIS! The curtains hang on the rod from the top of the grommet (or the top hem in the casing). So I measured from the top of the grommet to my pin (the correct length) and got 40".

I added 4" for the bottom hem (40" + 4" = 44")

Using my tape measure, I measured 40" and 44" from the top of the grommet opening and marked with a pen. 

I went to my cutting table and cut off the excess fabric at the 44" mark. OH...this fabric was a pain to work with! It shifted all over the place...thank heaven for painter's tape!

I pressed at 40" and tucked 1" under for a seam allowance. 

I measured again. I held them up and looked. Were they even? Yes! I sewed the hem using my walking foot and a 4mm stitch length.

They turned out great. I'll have pictures soon! Here they are!


When it comes to making curtains, check out the tutorials at Sew4Home!


Saturday, June 14, 2014

Happy Flag Day


Happy Flag Day and Happy Birthday to my friend Alysa! What a great day to be born. 

Last year I made her this little American flag-inspired foot stool. It ended up being a little Cat-In-The-Hatish...which isn't too bad, because her cat loved it!


Want to make a bigger version of this? Download my free Plush Pouf pattern. Just head over to Shannon Fabric's My Cuddle Corner!


Friday, June 6, 2014

Office Chair Slipcover


Earlier this week, my guy asked me if I could recover these office chairs. Hmmm....I wasn't so sure of my skills, but I agreed. I'd slipcovered my sofa and ottoman, but this was new territory.

He dropped off the chair without the frame and I got to work. Because there are two chairs, I decided to make a muslin pattern first.

I went to work pinning and fitting the muslin. I did the same thing I did when I made the slipcover for my sofa.


I sewed it together using a basting stitch (easier to take apart if there is a problem).


And ended up with this. I wasn't sure what to do around the bottom, so I made a skirt. But he's not a "skirt" kinda guy. So he asked about elastic....that would just draw the excess fabric in underneath. My thought was that I'd hem it and put a drawstring in - much better than elastic.


At this point, it looked OK. It was a bit wonky. He's an engineer. Wonky is not good.

The next morning, I had things figured out. I decided to use this muslin slipcover as a pattern.


I took it off the chair and, using a red ultra-fine-tip Sharpie, I traced my stitching.

Once I was done, I used a seam-ripper and took the muslin pattern apart.

I ended up with this. I had three pieces - a seat, the seat back, and the skirt.


Oops. OK, I got a little impatient and decided to tear...which tore! I patched it with some light-weight fusible interfacing.


This left me with the problem of adding my 1/2" seam allowance. I found my compass (every sewist should have one! ) and set it to 1/2" and went to work making a "good pattern."


I placed the pattern pieces on muslin and traced around them with my compass. I don't have any pictures of that.


I sewed it together and got this. Looks fab!


Except...I measured the skirt wrong!


I ripped out my seams to unveil my final pattern.


I ended up cutting the seat piece in half and placing it on the fold. This helped keep everything symmetrical and even.
This is the back piece.


For the skirt, I cut a piece of fabric/sewed together and ended up with a 4" x 70 1/2" skirt.


Before final assembly, I did an overcast stitch around all the fabric.


Here it is!


To make the skirt, I added two buttonholes and threaded some cord through the 1/2" seam. I used my Dritz Drawstring Threader to work the cord through.


It took me about 75 minutes to make the other one.


I don't have a final picture of the chairs in his office. I'm working on that! 

There are several lessons I learned while making these: (1) It's amazing how much confidence I gain when I know someone believes in me. My guy seems to think I'm a sewing genius. I think he had more faith in me than I did! (2) When in doubt, slow down and make a pattern. This is not easy for me - I'm a little impatient. But this slipcover fits like a glove, so the time it took to make a pattern was worth it. (3) When I'm a little baffled, go for a walk or sleep on it. I'm amazed by what my rested brain can accomplish. (4) The right tools make life easier. By that I mean, hurray for the compass and drawstring threader!

Every new challenge creates new skills. What are you going to challenge yourself with!?

Tuesday, January 7, 2014

Kitchen Dish Mat Redo

As much as I love my dishwasher, I do take care of certain items by hand washing them. My only problem (besides having a smaller-ish kitchen) is that I have a corner sink - with only one big sink. This makes air drying items a bit difficult. I eventually tried out one of those microfiber dish drying mats. But once again, the corner sink was a bit of a problem: the mat didn't fit well.


I lived with it for about six months, then finally decided to channel my handy mother and hack the corner of the mat so it fit snug up against my sink. The first thing I did was carefully remove the binding, then I marked where I wanted to cut and cut (with a rotary cutter), and lastly I sewed the binding back on.

Snug. And just the perfect size! 

The best thing of all? It's -4 but the SUN IS OUT! January in New York!


Saturday, November 2, 2013

Fall Wall Art - Free Pattern


I designed this Fall Textured Wall Art for Sew Mama Sew, so be sure to head over to their blog to get the free pattern! It's made with Shannon Cuddle and satin, along with some scraps of dupioni silk! And it's really easy to make!


Monday, September 2, 2013

Painting Time

I've had to take a break from sewing to finish up some warmer weather projects, namely painting my exterior doors. Ick.

Back in 2002, I had looked at about seven houses and, the minute I saw this house, I knew it was the one. Why? I fell in love with the front door. It was cute and charming! Luckily the inside had just as much character. Right after I moved in, my dad repaired the door -- it was really weather-beaten. I primed and painted it in a green color close to what was already there.

Over the years, I worked on more house projects but knew that I'd eventually come back to the front door. So a few weeks ago I decided to take the plunge and start working on it. Once again, it was weather-beaten and a bit sad. It was going to be a little more work this time.


I was going to remove the door and have it dipped but decided against it (to save $$). It was fairly easy to get the four to five layers of paint and varnish off.


I primed it with tinted primer. Yes, it's a mess in the window. I'll remove it with a razor blade once I'm done.


One coat of red paint! My house is a Cape Cod style house, so I went traditional with the color. I was really leaning toward raspberry just to update it, but red matches the interior more.


Next weekend I'll add the final coat and then paint the screen door (black). Whenever I do project like this I always think, "Why did I wait so long?" and this time was no different. I LOVE my repaired and updated door!

Wednesday, July 31, 2013

Purple and Pink Papasan Remake


Yesterday I wrote about my friend who is moving back to Michigan. She was getting rid of stuff, so I grabbed one of her papasan chairs. I don't need a papsan (seriously - I'm almost 49 years old!), but I had a feeling that it would be perfect for my friend's 13 year-old daughter. She picked the colors (purple and pink) and I went to work.

The original denim cushion was a circle with a 53" circumference. I didn't want to invest a lot of money in the cover, so I went through my stash of home dec/twill/cotton duck and found a mix of pink, fuchsia, and purple. And here's what I did:

1. I cut a bunch of 9 1/2" squares -- and picked 36 of them - to create six rows of six squares.

2. Using a 1/4" seam, I sewed the squares together to end up with a 54" square.

3. I cut that square into a 54" diameter circle.

4. With RST and using a 1/2" seam, I sewed the circle to a piece of fuchsia baby-whale corduroy. I left an opening that was about 18" or so.

5. I turned it right side out and stuffed the cushion through the opening.

6. I pinned the opening closed and machine stitched it shut. Probably the most difficult part of the project - I just about wiped everything off my sewing machine table.

It took four cans of purple spray paint to cover the frame. It wasn't easy - it was either raining or too humid to paint! But I got it done! YAY!

This project was a lot of fun - and it was a perfect way to use up some of my scraps.


Tuesday, July 30, 2013

Flag Day Foot Stool!


My friend is moving back to Michigan (our home state!) and I wanted to make her something special. She was born on Flag Day, so I decided that she needed a foot stool for her new home! This is 18" tall with an 17" diameter.

There are two 22" zippers that are placed at the top to create a hinged opening. If you'd like to make one, here are the measurements:

  • Two 18" circles
  • Side panel needs to be any combination that adds up to 18" tall
  • The side panel is 55 1/2" long.  


Monday, July 1, 2013

Porch Make Over - Foot Stools Done!

Part one of my porch make-over is done. I completed my cute little foot stools - I made two of them. These are 18" tall with an 18" diameter circle. I stuffed the inner foot stool (that I made out of denim) with one bag of Fairfield Poly-Fil Bean Bag Filler. It's 2.5 cu feet. The cover is made from outdoor fabric that I purchased from Fabric Guru. It's zippered and removable. 

I just pinned that tassel in place - deciding if I want to sew it to the zipper pulls. I kinda like them - but I have to see if my cats play with them!

Stay tuned for more!

Once I'm done sewing, I'll get a pattern written up so you can make one of these. 


Friday, June 28, 2013

Porch Make-Over

I have a wonderful screened-in porch that I use all summer. I love it and my cats love it. About thirteen years ago, I purchased some rugs for a different home. When I moved to this house, I put those rugs on my porch where they stayed year-round...for eleven years!

For the past two years, I've been searching for new rugs. I knew what I wanted but had trouble finding them. Last month I hit pay dirt. Online. At Home Dept. I found my colorful and beautiful rugs on the cheap and bought two (roughly 5' x 7'). FYI - the rugs are discontinued...of course!


I then went to work taking down the old roller blinds and adding new ones. Here you can see my helpers. 


I found some great fabric at Fabric Guru that I will use to make some new cushions for....


.... these chairs. I know. Ick. I did a little work on them last year. But I'm taking it to the next level!

Thankfully, Fairfield World sent me some Poly-Fil polyester fiberfill - they will need to be re-stuffed!

And I'll be making some foot stools!
I have some other projects in mind, so stay tuned!


Monday, June 24, 2013

The Plush Pouf Free Pattern

The Plush Pouf measures 18" tall with a 28" diameter
When I had my studio, one of the most popular sewing classes I taught was pouf-making! I designed this pattern with an eye toward practicality. Most pouf (patterns) don't include a zipper, which can make refilling and cleaning a problem.  And some are stuffed with fiberfill, which flattens. This FREE PATTERN is for making a pouf that is zippered and filled with bean bag beans! 

The one above is made from Cuddle (Majestic) by Shannon Fabrics. Yes..stretchy, plush, minky cuddle! I've made several poufs (as have my friends) out of home dec, but this fabric was a game-changer for me. It's beautiful. And the contrasting faux leather/vinyl band is the icing on the cake. 

I'd rate it an intermediate to an intermediate+ because Cuddle can be tricky to sew, which makes putting in the zipper a bit more work. I think it's worth the effort!

Are you ready to give it a try!? You can read more about it and download the FREE pattern on Shannon Fabric's My Cuddle Corner blog!

You can purchase Shannon Fabric Cuddle at local quilt shops and online at Fabric.com

Saturday, May 4, 2013

Living Room Curtains

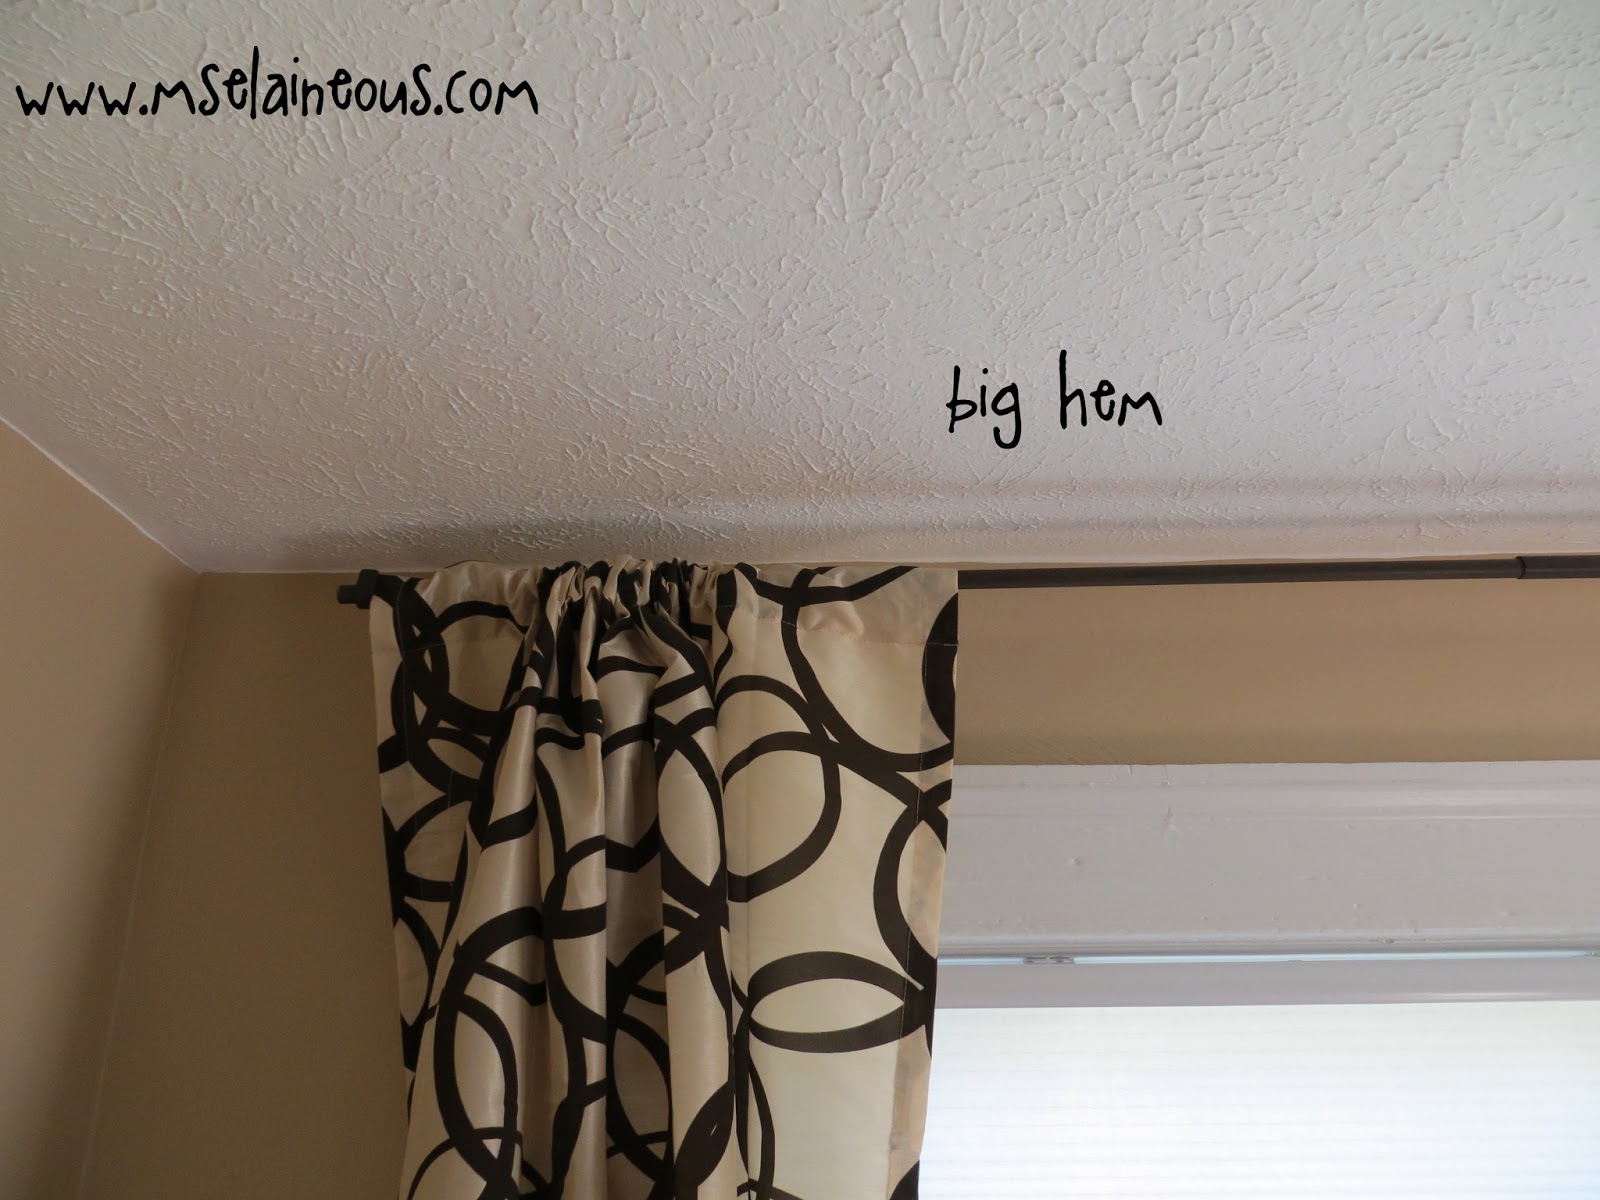
A few weeks ago, I ordered some new curtains for my living room. I wrote about my "do I make them or buy them dilemma?" in this post. I ended up buying some online and LOVE them. They did not come without problems, however. They were too long and the hem for the rod was too big - consequently, I hated how they hung.

It took only a little bit of work to go from  the big hem - designed to fit almost any sized curtain rod....


...to the smaller hem that hugs this curtain rod better. All I did was lengthen my stitches and use a 1" seam allowance. Super easy to do.


I then rehung them to determine the bottom hem. My next step was to rip out the existing hem, press it flat, and fold it up. I didn't have to cut any extra fabric. So my bottom hem is about 5", which I'm fine with.


And here they are. It was really sunny when I took this picture! Happy May! 

And if you are wondering, I got the suitcases at the Salvation Army about eleven years ago. My dad added the legs to the huge trunk to make it into a table.

Saturday, April 20, 2013

Living Room Make-Over!

I've taken a bit of a break from sewing to get some projects done around my house. I think the sunshine and warmer temps got me charged up!

Back in October (or was it September?), I painted the ceiling in my living room. I had a new French door installed in the entry, so I had to wait to paint the walls. And wait I did...six months. I had plenty of time to do it. I don't know why, but the urge to paint never came over me...I had trouble picking the color. And I couldn't get past the fact that I needed to paint the trim, too. I hate cleaning paint brushes after using oil-based trim paint!

But two weeks ago something snapped. I finally got around to finalizing a color, emptying my living room, and painting the walls. And last weekend, I mustered up the energy to sand, prime, and paint the trim. And as usual, now that it's done, I ask myself why I waited to so long! 


My new dilemma was this: to make or to buy curtains. I've made curtains before and didn't really enjoy it. I wrote about it here. The upside to making them is that they are exactly what I want. The downside is that they are expensive (about 3 yards of fabric per panel plus almost 3 yards of lining) and cumbersome to cut and sew.

I decided to spare myself the agony and, instead, went online to look for curtains. After a quick search, I found these on Overstock - perfect and only $36 per panel! The only problem is that they are a bit too long. 

So tomorrow I'll be hemming them, pressing them, and hanging them. I guess that's where the sewing skills come in handy!
Related Posts Plugin for WordPress, Blogger...