Pages

 photo Home_zpspchzwjez.png  photo Patterns_zpsffe5v7nd.png  photo Tutorials_zpsplo1y0ea.png  photo 193faa8a-319f-4666-9915-a2cc9af19bda_zpsah1i88qv.png  photo 1aff47d5-9779-4086-ae8c-7c8a885b6c47_zpsyyyqf1xu.png
Showing posts with label Machine Embroidery. Show all posts

Wednesday, July 3, 2013

Stitcher's Showcase!


I love Embroidery Library and I love my home state of Michigan. So I sent them a picture of a pillow I made for my friend in hopes that it would be included in their Stitcher's Showcase! And it was! YAY!

Did you make something from one of their designs? Be sure to send them a picture and maybe you'll be selected!


Sunday, February 3, 2013

Sparty On! Pillow


A few weeks ago I downloaded a Michigan embroidery design (applique) and made myself a Michigan pillow. My friend (who I work with) saw it and fell in love...see, she's from Michigan, too. Except she went to Michigan State. Not to sound like Mona Lisa Vito, but...my oldest sister went to Michigan State, my other sister went to Michigan State, my sister-in-law went to Michigan State, my nephew went to Michigan State, most of my friends went to Michigan State....get the picture? I, however, went to Central Michigan then moved on to...Penn State (OK, they weren't in the Big Ten when I was there).

Nonetheless, I actually volunteered to make my friend a Sparty On! pillow that celebrates both her hometown and her alma mater. And here it is. It's quilted with strips of green and white. The finished size is 12" x 16." I appliqued blue polar fleece to create the Michigan shape...hey, it's the Great Lake State! The heart is bigger than what I wanted, but any smaller and it would have disappeared into the fleece. 

I can't take a picture of my hand (Michiganders will get that), here is my personal map.
One of these days I'll make a maroon and gold one for my house. Fire Up Chips!!

Thursday, January 10, 2013

Embroidering on T-Shirts

My friend's sister-in-law opened a yoga studio and on Monday I'm taking a class. I work out but... this will be a big change. I run and I have no flexibility. I don't know what has me more concerned: doing yoga in a 110 degree room or doing yoga for 90 minutes! Nonetheless, I embroidered some t-shirts for us.

I love personalized, embroidered t-shirts, but they can be a bit tricky. So I recommend reading this great article from Embroidery Library on embroidering on t-shirts. Additionally, here are my tips:

1. Pre-wash your t-shirt.

2. Use a ballpoint needle. For these I used a Schmetz Stretch 11/75. This is a knit so that's why I use a ballpoint.

3. I used an iron on tear-away stabilizer (like Sulky Totally Stable) first. This is paper and when it's ironed to your t-shirt, it makes it stiff and not stretchy. Then it just tears away when you are done. The only purpose to to keep the t-shirt from stretching when the design is stitched on. I prefer this to spray adhesive.

4.  Mark AFTER you've ironed the stabilizer. I do this because I worry about the heat from my iron permanently fusing the marks to my t-shirt. 

5. Add a cutaway stabilizer. For most t-shirts I use a medium weight. 

6. Follow the hooping directions at Embroidery Library. The hair clip idea is genius.

If you like the yoga design, you can find it at Embroidery Library.


Monday, August 20, 2012

A Cheap Way to Clean Embroidery Hoops

I am a big fan of basting spray when I machine embroider. I make a lot of in-the-hoop designs, so I spray...spray...spray. Consequently, my hoops get gunky with glue residue. That glue then attracts all sorts of fuzz and thread.

When it comes to cleaning my hoops, I learned a nifty trick a long time ago. Yes, there are expensive hoop cleaners out there, but you probably have the best one stored away in your house. WD-40. So here's what you do.

Take your hoop apart and put it in your kitchen sink (or some place flat -  on newspaper outside?). It does stink a bit, so I open the window. Spray WD-40 on the hoop and let it sit for about 15 minutes. When the time is up, take an old toothbrush and scrub the residue off. It's a bit gross, so use a paper towel to clean the toothbrush. Scrub a bit more. You might need to repeat the process. 

When the residue is gone, wash with a little dish detergent, rinse, and let it dry. 

And a few other things - use WD-40 to remove residue from a bumper sticker. It really works. BUT DO NOT use WD-40 to oil your machine. YIKES! Use sewing machine oil and only sewing machine oil.


FREE In-The-Hoop Designs:
Never tried In-The Hoop Designs? Looking for some free designs? Here are two of my favorites:


Be sure to check out all their free designs!

Saturday, July 7, 2012

Embroidery Thread Chart

I can never keep track of my embroidery thread. I keep telling myself that I remember what I have....but I end up with duplicates. So here's a little trick...

Find chart of your favorite brands (like this one from Isacord or this one from Sulky or these from Robison Anton) and print it (in color...obviously). 

Laminate it or slide it into sheet protectors. Then use a dry erase marker or overhead transparency marker to mark down what you have. When you run out, just erase it! You'll want to be careful of dry erase markers - the ink rubs off with little effort.

Monday, June 11, 2012

Travel Tumbler


I've rediscovered my embroidery machine since I made the Monogrammed Market Tote. I purchased some "blanks" at Discount Embroidery Blanks and made a monogrammed 16 oz tumbler. This is an easy...easy project!

SUPPLIES:
  • Lightweight Tear-Away Stabilizer
  • Temporary Spray Adhesive (I used 505)
  • 11/75 Microtext/Sharp Needle (I used a 10/70 and it worked fine).
  • Embroidery Supplies
  • A design. I used this free font from Five Star Fonts...yes, a free font! It's the Fun and Funky Fill Stitch Font. It's 3 1/2" tall and about 1 1/2" wide.
 
THE PROCESS:

Follow the directions on the handouts/PDF files that come with the blanks. I made small registration marks on my paper and my template so I could figure out the center of the design.

I hooped a lightweight tear-away stabilizer, sprayed with 505 Temporary Fabric Adhesive, and centered my paper in the hoop.

This isn't regular paper, either. It's got a rubbery/foamy feel to it.


I used my template to cut out the design. The tab in the lower left corner is there to help make the paper easier to remove from the tumbler.


Just unscrew the bottom, roll the paper, and slip it in. Screw the bottom back in and you are ready for a trip!


Wednesday, June 6, 2012

The Monogrammed Market Tote


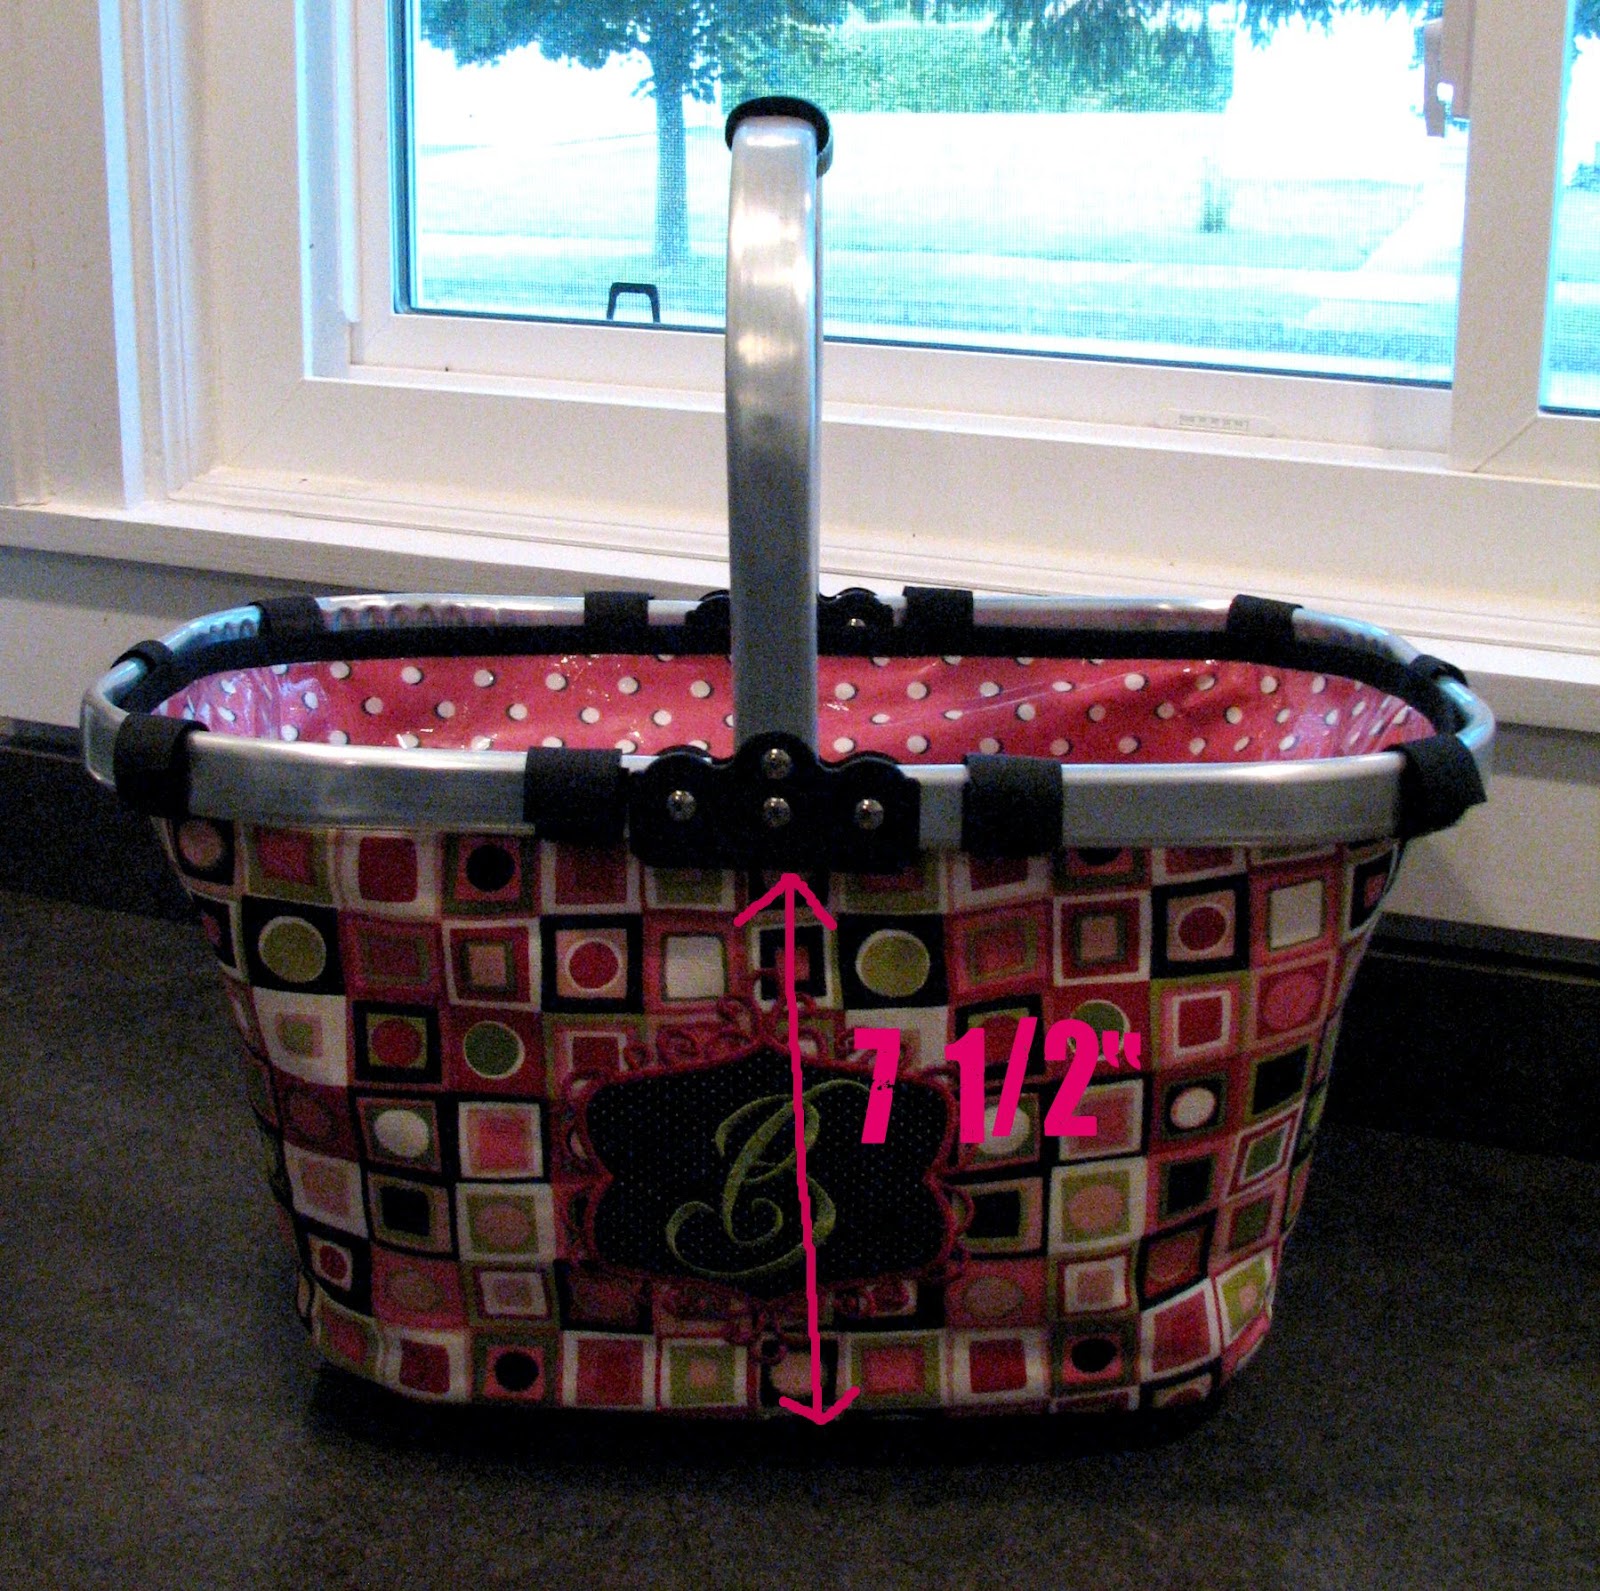
A few days ago I made my own bag for a purchased Collapsible Market Tote. Yesterday I decided to monogram a market tote with my favorite monogram from Five Star Fonts:The Posh Swirls Elegant Monogram. There are two sizes with the design and this is the bigger one.

After I cut my sides to the rough size and fused the interfacing, I traced my pattern piece so I could determine design placement.


I originally thought that the distance from the bottom to the top (right under the frame) was 8" - this is why my monogram is a bit low. It needed to go up about 1/4." It's actually 7 1/2" - which makes the middle 3 3/4". So to find the center point, mark 3/8" from the bottom (to account for the seam allowance), then go up 3 3/4".

When figuring out the middle, remember that some of the bag is tucked under the frame - so don't use the center of the fabric as the middle point!


Here it is! Make sure you spray the applique fabric with some basting spray before you put it on the design. It holds it in place and reduces puckering.


This design is the perfect size for the tote. 

I haven't been doing a lot of embroidery lately. This project made me realize how much I love it!


BTW, if you want to put the stays in, add them to the lining instead of the exterior.


TA-DA!! These make great gifts. It's the end of the school year - how about as a teacher gift? You could add a pocket to the lining and put a gift card in there or fill it with fun summer items and a special note from your child.


Related Posts Plugin for WordPress, Blogger...