I've been playing around a bit more with the Shannon Fabrics Lagoona Cuddle. While I was on Pinterest, I spied this cute beach ball pattern from The Purl Bee! I found my next project!
Like some of you, I often approach patterns a bit differently because I want things to sew together easily. So I downloaded The Purl Bee pattern, cut out the medium sized beach ball, and made some changes. Here's what I did differently:
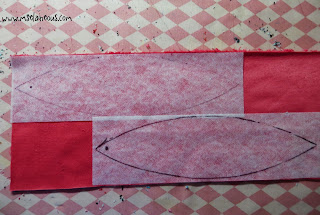
I traced the pattern on to the smooth side of some Pellon Sheerweight fusible interfacing. I used a Sharpie Fine Tip permanent marker.
Then I fused them to the Shannon Cuddle. I put a dot at one end so the direction/nap stayed the same.
I cut them out and laid them so all the dots were at the top.
Using a 1/4" seam, I sewed them together, two at a time. A walking foot makes this process go quickly. Also, make your stitches longer - like 3mm.
Then I sewed two together. I did pin - which I normally don't do. But it really helped keep things aligned. Remember...dots at the top!
When you sew them together, start at the seam at the top.
Line up the seams at the bottom then sew down until you reach the seam. And always backstitch!
You'll end up with these.
Join them together (dots at the top). And start sewing from the top. As you approach the bottom, line up your seams and continue sewing all the way around, stopping when you are about 1" to 1 1/2" from where you started.
Turn right side out through the hole.

And stuff. Firm. Fairfield Polyester Fiberfill is the best - it doesn't get bunchie!
Using a ladder stitch, sew the opening closed. I love the ladder stitch!
And now on the top of the beach ball. I found a wine glass with a base that was about 2" - I have a collection of these wine glasses from wine tasting events on Market Street in Corning! YUMMY!
I placed the glass on the smooth side of my sheer weight interfacing...
...and traced the base with a mechanical pencil. I did a rough cut. DO NOT cut out the circle - you don't need to! YAY!
You'll need FOUR pieces of interfacing. I originally only cut two - but changed my mind and cut two more.
I fused four pieces of interfacing to the back of four pieces of Shannon Fabrics Silky Satin Solid!
Satin can fray a bit, so this is why I fused interfacing to all four pieces.
Put the satin RST and pin. Then sew RIGHT ON THE LINE that you drew.
This is a bit of a pain, but I sew a few stitches, needle down, lift the foot, rotate, sew a few stitches...etc. Always backstitch when you begin and end. SEW ALL THE WAY AROUND!
NOTE: You can see here the one side didn't have the interfacing. I fused it on afterwards.
 Slice ONE side of the fabric. Trim off excess (so you have about 1/4" seam alowance).
Turn right side out through the slice.
Using a turning tool (like a knitting needle), flatten your circle and press.
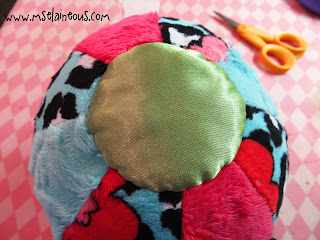
VIOLA! See how great the front looks! And no one will ever see the back!
Pin to the top of the beach ball with the nice side up (obviously!).
Sew the circle to the beach ball. I worked the needle through and in between the seam area. It hid my stitches.
DONE! Now repeat on the other side!
This would be really easy to make into a "taggie" just by randomly adding ribbon. Here it is with my three Cuddle Cubes!
Be sure to LIKE Shannon Fabrics on Facebook!


A little note to let everybody know about the powerful work of doctor chimnedum herbal home. My name is Gazalee from Malaysia and i was ones a HEPATITIS and HBP victim until i read about Dr chimnedum herbal home online on how he cured so many people with herbal remedies,and i contacted him for help and he really helped, after i applied his herbal remedies. i am testifying to this great Dr chimnedum herbal home because i want everybody to be informed so that you will contact him today for your cure, Contact him through: dr.chimnedumherbalhome1616@gmail.com Call/Whatsapp: +2347086675538,I'm healed,
ReplyDeleteis a great thing in my life today.
Mind Blowing info, Loved your way of explaining. Sewing Machine Opinions
ReplyDelete