


My first experiment with quilting began in the crazy arena when I saw this technique on a television show. I loved that nothing really needed to line up. For me, it was the perfect place to start my quilting journey. So here is a simple technique for creating a crazy quilt block. The final block size is 8 1/2".

1. Get Fabric: Start with five different 10" squares of fabric. You can use a layer cake if you'd like. These are just some scraps that I had.

Get ready to cut your fabric; you'll be making one less cut than to the total number of pieces of fabric. So, I have five pieces of fabric and will be making four cuts. If I had four pieces of fabric, I'd make three cuts.

You now have two pieces/sections.

4. Cut again: take one piece and make your second cut. It doesn't need to be exactly like this!

5. Make your third and fourth cuts.
I made four cuts and end up with five pieces. The five pieces represent the five fabrics you started with.

6. Re-stack the fabric:
Take the top piece from stack 2 and place it on the bottom of stack 2.

It should look like this.

7. Stack Again! Take the TOP TWO pieces from stack 3 and place them on the bottom of stack 3.
It will look like this!

8. And Again! Take the top THREE pieces from the next stack and place them on the bottom.
Then take the top FOUR pieces from the next stack and place them on the bottom.

9. Done! You'll end up with five blocks (layers) that are all mixed up. But there is a correct order, so don't start moving them just yet.

10. Separate Layers: Take each layer and separate them into your five blocks. You will have one piece of each fabric in a different spot on each block.
I put a piece of paper under each set so I could easily carry them to my machine to piece. This helps me keep things sorted.

11. Sew Together:
Sew 1 to 2 and then 2 to 3.
Then sew 4 to 5.
You'll have two parts.
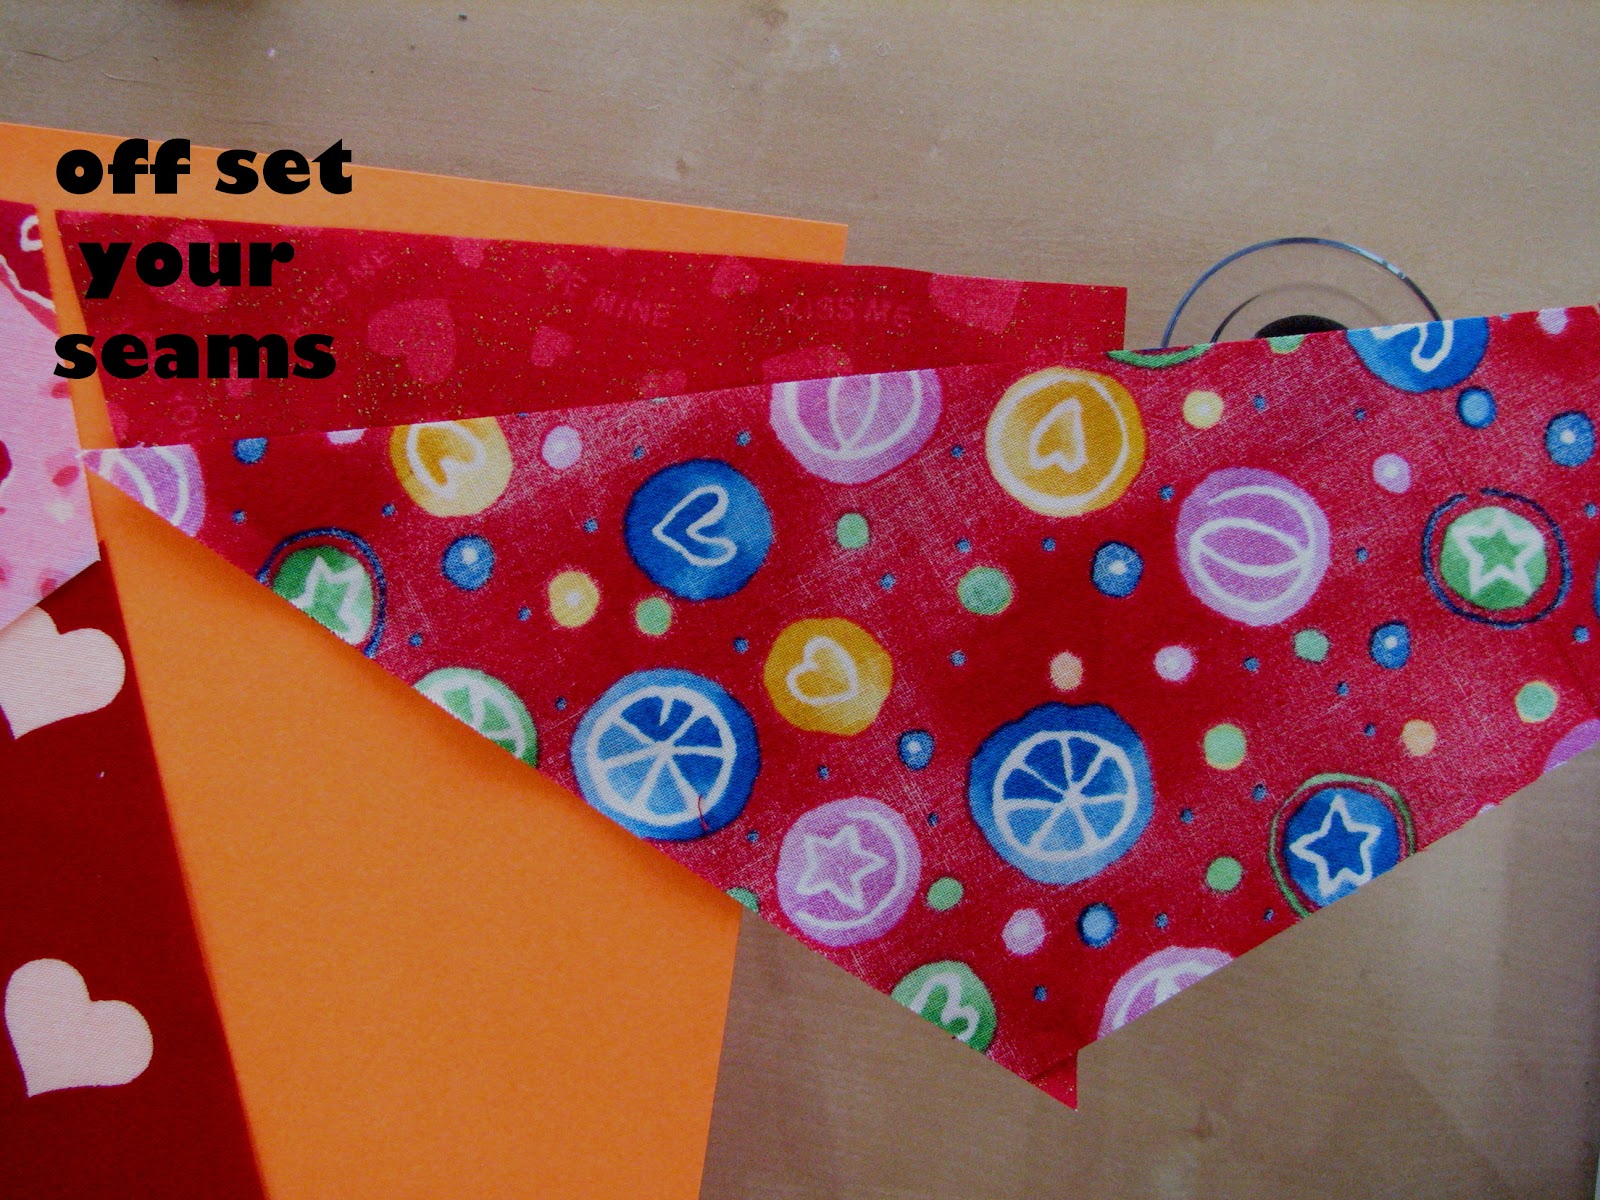
You will want to off-set your seams about 1/4" so the edges of the fabric line up more closely. They won't be perfect.

12. Trim your edges: you'll be sewing this to the 4/5 pieces.

13. Trim your other edge. It should look like this - nice and clean!
And one piece is a little bigger than the other - not a problem.

14. Sew together.

15. Square it up! I used an 8 1/2" square ruler.


And here are the completed blocks.
You can take it from here! You can make a quilt or sew these together, quilt, and make a tote or purse.

Thanks for stopping by! As a gift, here's a free pattern for a round, zippered pouch. It's easy to make...you don't have to cut circles!
UPDATE: I've added some information on other cutting options!
Thank you- I think I can do this!
ReplyDeleteHave fun and feel free to experiment. If your blocks are a bit too small, just add a row.
DeleteThank you for making something easy that had previously been a very complicated concept for me. I'm off to attempt my first crazy quilt...
ReplyDeleteLet me know how it goes! Good luck and have fun!
DeleteThanks for msking this so easy. I love them but found it difficult till now. I have a traumatic brain injury. More quilts posted like this Please.
DeleteA little note to let everybody know about the powerful work of doctor chimnedum herbal home. My name is Gazalee from Malaysia and i was ones a HEPATITIS and HBP victim until i read about Dr chimnedum herbal home online on how he cured so many people with herbal remedies,and i contacted him for help and he really helped, after i applied his herbal remedies. i am testifying to this great Dr chimnedum herbal home because i want everybody to be informed so that you will contact him today for your cure, Contact him through: dr.chimnedumherbalhome1616@gmail.com Call/Whatsapp: +2347086675538,I'm healed,
Deleteis a great thing in my life today.
Parabéns, sua explicaçao foi ótima, me ajudou muito.
ReplyDeleteOh wow, stunning, love the color combination. I have to try this with my Cake Layer squares. I'm going to handstitch tho' :-)
ReplyDeleteHi Charmaine! Thanks! The final, completed quilt was done with a layer cake. It was the very first quilt I ever made!
DeleteA little note to let everybody know about the powerful work of doctor chimnedum herbal home. My name is Gazalee from Malaysia and i was ones a HEPATITIS and HBP victim until i read about Dr chimnedum herbal home online on how he cured so many people with herbal remedies,and i contacted him for help and he really helped, after i applied his herbal remedies. i am testifying to this great Dr chimnedum herbal home because i want everybody to be informed so that you will contact him today for your cure, Contact him through: dr.chimnedumherbalhome1616@gmail.com Call/Whatsapp: +2347086675538,I'm healed,
Deleteis a great thing in my life today.
Coping with any kinds of illnesses is not an easy mission especially if it comes to the herpes sickness. I'm also here to express my joy and tell the world the actual truth which is; there is herbal cure for herpes infection, all my career I've lived my life believing this. Since four years ago and till today I still say yes! Dr Edidia (dredidiaherbalhome@gmail.com) or whatsapp number +2349074505296 cures this infection using African traditional herbal medicines. After he cured me four years ago of herpes, ever since then I worked with him distance never a barrier, I'm a living witness to this. And I have directed both genital and HPV patients to him and they are permanently cured. there is a cure to all diseases including HSV, HIV, CANCERS, DIABETES, HEPATITIS B, COPD, FIBROIDS using the right medications with the right herbalist Dr Edidia. Are you herpes positive and permanently want to get rid of this infection contact dredidiaherbalhome@gmail.com or whatsapp +2349074505296 for permanent herbal cure. Be bold and smart. Don't be fooled by selfish people who say there is no cure. he is a great healer
DeleteThis us a really neat way to cut fabrics for a crazy quilt look. Thanks a bunch for the info!
ReplyDeleteGracias por el tutorial quedo muy bonito y algo muy personalizado.
ReplyDeleteI made my first crazy quilt blocks from scrap fabric. After I sewed several together, I cut them for cute placemats. Thanks for the great tutorial!
ReplyDeleteSure thing! Glad you enjoyed it!
DeleteHeh, I really like your first crazy quilt. I write a blog you might like, visit www.goodearthquilting.blogspot.com
ReplyDeleteThank you so much for the great tutorial...I am just getting in to quilting and I really like your method for this crazy quilt block. I'd also like to thank you for the round zippered pouch pattern.
ReplyDeleteSure thing! It's a great quilt for a beginner - nothing needs to line up! And I hope you enjoy the round zippered pouch pattern. It's based on applique and machine embroidery (in-the-hoop) techniques!
DeleteA little note to let everybody know about the powerful work of doctor chimnedum herbal home. My name is Gazalee from Malaysia and i was ones a HEPATITIS and HBP victim until i read about Dr chimnedum herbal home online on how he cured so many people with herbal remedies,and i contacted him for help and he really helped, after i applied his herbal remedies. i am testifying to this great Dr chimnedum herbal home because i want everybody to be informed so that you will contact him today for your cure, Contact him through: dr.chimnedumherbalhome1616@gmail.com Call/Whatsapp: +2347086675538,I'm healed,
Deleteis a great thing in my life today.
Just seeing your post. Thank you for taking the time to write instructions. This is perfect for my project. Baby blankets for unwed teens in our church service outreach. Thank you ��
ReplyDeleteCan I adapt and use something like Jelly rolls?
ReplyDeleteOr Use 5 inch squares instead of ten inch?
DeleteClaro que sí. Lo único que te pasará es que tus bloques serán muy pequeños.
DeleteA little note to let everybody know about the powerful work of doctor chimnedum herbal home. My name is Gazalee from Malaysia and i was ones a HEPATITIS and HBP victim until i read about Dr chimnedum herbal home online on how he cured so many people with herbal remedies,and i contacted him for help and he really helped, after i applied his herbal remedies. i am testifying to this great Dr chimnedum herbal home because i want everybody to be informed so that you will contact him today for your cure, Contact him through: dr.chimnedumherbalhome1616@gmail.com Call/Whatsapp: +2347086675538,I'm healed,
Deleteis a great thing in my life today.
Obrigada, adorei seu tutorial
ReplyDeleteVeja o de Patrícia Whashington
Steck nouak
https://youtu.be/_xS6zPUNr5Y
https://www.youtube.com/watch?v=_xS6zPUNr5Y&feature=sharpei
ReplyDeleteAll thanks to Dr KOKOBI for curing my herpes virus/hpv with his herbal medicine, i do not have much to say but with all my life i will forever be grateful to him and God Almighty for using Dr KOKOBI to reach me when i thought it was all over, today i am happy with my life again after the medical doctor have confirmed my HERPES SIMPLEX VIRUS / HPV of 5 is gone. I never in my life believed that HERPES SIMPLEX VIRUS could be cured by herbal medicine. so i want to use this means to reach other persons who have this disease to know that all hope is not lost yet. contact him via kokobiherbalremedycentre@gmail.com or whatsapp +254746618873 and get your healing for any kind of disease. You can also call him via +2348114448587
ReplyDeleteALL THANKS TO DR OSO WITH HIS HERBAL PORTION I WAS COMPLETELY CURED FROM BREAST CANCER. I'm here again to appreciate it. DR OSO God will always continue to bless you more abundantly, for the good works you do in my life, I will always keep on writing good and posting my testimonies about you on the Internet, I’m MARY JOHNSON from TEXAS . I was tested breast cancer positive, I saw a blog on how DR OSO cured people with his herbal portion, i did not believe in natural medicine but i just decided to give him a try, I contacted him, and explain my situation to him, few day later he sent me the herb, after taking DR OSO herbal medicine for few weeks i went to hospital for check up so luckily i was healed with his herbal portion, i am so happy. If you have any type of cancer problem or you are also infected with any kind of disease,
ReplyDeletecontact him drosohaberhome@gmail.com
call/WhatsApp +2348162084839
for advice and for his product, I hope this testimony also helps someone out there .. Here is the dr website.....
https://sites.google.com/view/drosohaberhome/
His blog page
https://drosohaberhome.blogspot.com
you can also email me for more info about DR oso via maryjohnson9700@gmail.com ALL THANK TO DR OSO .
I would like to thank Ultimate Life Clinic for reversing my father's Amyotrophic Lateral Sclerosis (ALS). My father’s ALS condition was fast deteriorating before he started on the ALS Herbal medicine treatment from Ultimate Life Clinic. He was on the treatment for just 6 months and we never thought my father will recover so soon. He has gained some weight in the past months and he is able to walk with no support. You can reach them through there website www.ultimatelifeclinic.com
ReplyDeleteMy name is Thomas White, from United states, i have been Herpes positive and it is just like been through hell; well special thanks to God almighty for using Dr Twaha, the greatest Herbal doctor in curing my herpes disease. I was diagnosed of this disease in the year 2004. Although I was taking my medications I was not myself. Until a few weeks ago. My friend came to me and told me that he saw many testimonies on how Dr. Twaha cured people Herpes disease. Although I never believe in herbs, I said to myself "seeing is believing" I took his name and searched it on GOOGLE, I saw many testimonies myself. Quickly, I copied his email: drlregbeyen10000@gmail.com I emailed him, he gave me a form to fill which I did, then he sent me a message and told me that he required some items in which he will use in preparing the cure for me and he told me that it will cost me some money which i sent to him because I need the cure urgent, He bought the items and prepared a cure for me, then he sent the parcel to me through courier delivery service. I paid the courier services, I got my parcel, it was a bottle of ointment as described by Dr,Twaha After taking the ointment he told me to do, the herpes test and the result came out negative. Quickly I messaged him and told him what happened he congratulated me. I promised to tell the world about him. You can contact him with any problem via email: ( drlregbeyen10000@gmail.com ) or contact him on WhatsApp +2349038518881 thank you Dr Twaha
ReplyDeleteDr. Ehimare has really made me so much believe in him by getting me cured of Herpes with his herbal medicine. I have been a Herpes virus patient for some time now, I have been running here and there looking for help/cure but none could help. I ran into a testimony by someone who testified how she was cured of a terrible disease by Dr. Ehimare, so I decided to contact the herbal doctor. I explained to him, and he said he can cure me. We started the process and he prepared herbs and sent them to me in my country and gave me directions on how I am to use them. I followed his directions and now To God be the glory he could cure me with his herbal mixture. I really appreciate you Dr. Ehimare for bringing back happiness to my life again. thanks you so much friends that has join me to thank Dr. Ehimare for what he has actually done for me i pray to you all for a good life and property, his contact. Email address drehimare3@gmail.com , via whats-app +1 (267) 691-1087 Thanks Dr. Ehimare for your help in my life and family... and most especially to you Dr. THANKS.
ReplyDeleteThere is no other way to get the body of herpes virus other than detoxification using natural diet or pure herbs. The health industry is a billion dollars industry - which is why the big pharmaceuticals sued Dr. Sebi the moment he discovered a 1-Week CURE FOR HERPES (Oral and Genital). Most diseases are acquired by what you eat. Even when infected by someone, it thrives because your body is receptive and filled with mucus. No disease can survive in an electric filled body. What you eat will determine how you live, how you behave, and even how it relates to you. Detoxification is the heart of ridding the body of the herpes virus. There is no other way to bring the necessary result. There are three ways to achieve this; Stop putting acidic foods into the body - if possible eat only alkaline diet, Fast daily before eating if possible for a year, Cleanse the body of toxins and acids with Nze Njoku Herbal Formula (Which also increases oxygen to cells). Feed the body with the right nutrients to repair, rebuild, and strengthen it at a cellular level and watch the body heal itself.
ReplyDeleteSome may wonder, how long is one expected to maintain such a diet and what herbs can help you achieve all these within few weeks?
Nze Njoku Herbal Home provides all the
answers.
I have been suffering from a deadly disease (Hsv) for the past 2 years now, I had spent a lot of money going from one places to another, from churches to churches, hospitals have been my home every day residence. Constant checks up have been my hobby not until this faithful day, I was searching through the internet, I saw a testimony on how Dr Ehimare helped someone in curing his (Hsv) herpes disease, quickly I copied his email which is drehimare3@gmail.com just to give him a test I spoke to him, he asked me to do some certain things which I did, he told me that he is going to provide the herbal cure to me, which he did, then he asked me to go for medical checkup after some days after using the herbal cure, behold I was free from the deadly disease, he only asked me to post the testimony through the whole world, faithfully am doing it now, please brothers and sisters, he is great, I owe him in return. if you are having a similar problem just email him on Drehimare3@gmail.com Or whatsapp him via +1 (267) 691-1087
ReplyDelete
ReplyDeleteI am so Happy to be writing this article in here, i am here to explore blogs forum about the wonderful and most safe cure for HERPES SIMPLEX VIRUS.I was positive to the Virus called HERPES and i lost hope completely because i was rejected even by my closet friends. i searched online to know and inquire about cure for HERPES and i saw testimony about DR Ebhota online on how he cured so many persons from Herpes Disease so i decided to contact the great herbalist because i know that nature has the power to heal everything. i contacted him to know how he can help me and he told me never to worry that he will help me with the natural herbs from God! after 2 days of contacting him, he told me that the cure has been ready and he sent it to me via FEDEX or DHL and it got to me after 4 days! i used the medicine as he instructed me (MORNING and EVENING) and i was cured! its really like a dream but i'm so happy! that's the reason i decided to also add more comment of Him so that more people can be saved just like me! and if you need his help,contact his Email: (drebhotasoltion@gmail.com) You can contact him on WhatsApp +2348089535482 He also have the herb to cure difference cure for any sickness (1) HERPES,
(2) DIABETES,
(3) HIV&AIDS,
(4) URINARY TRACT INFECTION,
(5) HEPATITIS B,
(6) IMPOTENCE,
(7) BARENESS/INFERTILITY
(8) DIARRHEA
(9) ASTHMA..
My husband had MND ALS, first symptom was weakness in his fingers, one day, we had a dream life with early retirement and then, when we went to find out about the weakness, our whole world almost changed. There are so many things that can be said abt the suffering and frustration of people with ALS, we look back now and realize in many ways how lucky we were to found Multivitamin herbal cure that was able to get rid of my husband ALS disease totally, we had time to enjoy life and above all we all had time to also share this great testimony , many people lose loved ones without closure. I can’t imagine going thru all that you or your family had to live with daily, do not hesitate to contact w w w multivitamincare .org for ALS cure.❤💙💚
ReplyDeleteThis is a fantastic technique! Thanks so much for sharing.
ReplyDeleteAdana
ReplyDeleteElazığ
Kayseri
Şırnak
Antep
LK86
Erzurum
ReplyDeleteElazığ
Konya
Zonguldak
Eskişehir
0ZU
Bursa
ReplyDeleteMersin
izmir
Rize
Antep
LTJA
whatsapp goruntulu show
ReplyDeleteshow
QVW1
ankara parça eşya taşıma
ReplyDeletetakipçi satın al
antalya rent a car
antalya rent a car
ankara parça eşya taşıma
ROF
kayseri evden eve nakliyat
ReplyDeleteantalya evden eve nakliyat
izmir evden eve nakliyat
nevşehir evden eve nakliyat
kayseri evden eve nakliyat
LNV46
bartın evden eve nakliyat
ReplyDeleteedirne evden eve nakliyat
mersin evden eve nakliyat
sinop evden eve nakliyat
siirt evden eve nakliyat
XRB
ECD85
ReplyDeleteBartın Lojistik
Diyarbakır Evden Eve Nakliyat
Elazığ Parça Eşya Taşıma
Bayburt Lojistik
Aydın Lojistik
81689
ReplyDeleteAntep Evden Eve Nakliyat
Kocaeli Evden Eve Nakliyat
Antep Lojistik
Erzincan Evden Eve Nakliyat
Karabük Lojistik
53BE2
ReplyDeleteAfyon Parça Eşya Taşıma
Giresun Lojistik
Kars Parça Eşya Taşıma
Bartın Lojistik
Rize Evden Eve Nakliyat
13449
ReplyDeleteTekirdağ Evden Eve Nakliyat
Btcturk Güvenilir mi
Bitlis Evden Eve Nakliyat
Kastamonu Evden Eve Nakliyat
Ankara Asansör Tamiri
0F4D7
ReplyDeleteDüzce Evden Eve Nakliyat
buy parabolan
Sakarya Evden Eve Nakliyat
Çerkezköy Evden Eve Nakliyat
Elazığ Evden Eve Nakliyat
Silivri Parke Ustası
peptides for sale
Bitcoin Nasıl Alınır
https://steroidsbuy.net/
E3618
ReplyDeletemuş sohbet odaları
en iyi ücretsiz sohbet uygulamaları
aksaray canlı sohbet uygulamaları
canlı sohbet ücretsiz
canlı sohbet
ığdır sesli sohbet mobil
kastamonu canlı sohbet uygulamaları
kadınlarla ücretsiz sohbet
eskişehir en iyi ücretsiz görüntülü sohbet siteleri
F7A87
ReplyDeletebalıkesir en iyi rastgele görüntülü sohbet
tamamen ücretsiz sohbet siteleri
çanakkale görüntülü sohbet uygulama
yozgat canli sohbet bedava
hakkari ücretsiz sohbet siteleri
tamamen ücretsiz sohbet siteleri
rastgele görüntülü sohbet uygulamaları
adana rastgele sohbet odaları
rize telefonda kızlarla sohbet
F528E
ReplyDeleteşırnak rastgele sohbet siteleri
bedava sohbet odaları
bitlis sohbet odaları
agri ücretsiz sohbet siteleri
Antep Telefonda Rastgele Sohbet
eskişehir rastgele canlı sohbet
düzce canlı sohbet ücretsiz
Bolu Görüntülü Sohbet Yabancı
Afyon Görüntülü Sohbet Odaları
ACEA4
ReplyDeleteKwai Takipçi Hilesi
Okex Borsası Güvenilir mi
Expanse Coin Hangi Borsada
Hamster Coin Hangi Borsada
Kripto Para Üretme Siteleri
Tiktok Takipçi Satın Al
Bitcoin Madenciliği Nedir
Referans Kimliği Nedir
Facebook Sayfa Beğeni Satın Al
0DDB4
ReplyDeleteLuffy Coin Hangi Borsada
Bitcoin Nasıl Çıkarılır
Kripto Para Nasıl Oynanır
Bitcoin Kazma
Spotify Dinlenme Satın Al
Big Wolf Coin Hangi Borsada
Bitcoin Kazanma Siteleri
Okex Borsası Güvenilir mi
Star Atlas Coin Hangi Borsada
Have you been suffering from any kind of disease, and you want to be free from it. Then contact, Dr. Joseph Olorungbebe. On his WhatsApp: +2347026909147 Or email: drjosepholorungbebe@gmail.com
ReplyDeleteشركة تسليك مجاري بجدة WhM02nJfck
ReplyDeleteشركة عزل خزانات بخميس مشيط 9HcWV7heUp
ReplyDeleteشركة صيانة افران بالاحساء YERmMg7S24
ReplyDeleteشركة تنظيف سجاد بابها YFeFVAwREe
ReplyDeleteشركة تنظيف مجالس بخميس مشيط Kkbc6mFpKk
ReplyDeleteشركة عزل خزانات iW5D38vSpn
ReplyDeleteشركة عزل اسطح بالجبيل K99shML8Zw
ReplyDeleteشركة تنظيف مسابح بجازان FrxO8NPTCM
ReplyDeleteشركة عزل اسطح بالقصيم lGodLOZnLs
ReplyDeleteE4B33B7541
ReplyDeleteinstagram takipçi
ADE94FEEC9
ReplyDeletetiktok türk takipçi
EC2AEDC87D
ReplyDeletebot takipçi satın al
takipçi
düşmeyen takipçi satın al
Hangi Canlılar Yiyecek Bulmak İçin Yer Değiştirme Hareketi Yapar?
Meru Dağı
Doğadaki Fraktal Örnekleri
TL Trafik Cezası Nedir
Malatya Bölgesinde Yapılacaklar
Google Haritalara Yer Ekleme
A08C3E3A0B
ReplyDeletegüvenilir takipçi satın al
Free Fire Elmas Kodu
Stumble Guys Elmas Kodu
MFF Kupon Kodu
Total Football Hediye Kodu
Azar Elmas Kodu
Sıra Bulucu
Yalla Hediye Kodu
Online Oyunlar
شركة مكافحة حشرات بالجبيل
ReplyDeleteU6JxVVMFBT
I already gave up on ever getting cured of HSV2 because i have try many treatment none of them work out for me i have gone to different hospital they always tell me the same thing there is no cure for herpes, when i came across a post about Dr Osaka in the net from a lady called Angela i contacted her and she reassured me with his herbal medicine which i took according to the way he instructed, that how i was cured. I doubted at first because i have been to a whole lot of reputable doctors, tried a lot of medicines but none was able to cure me. so i decided to listen to him and he commenced treatment, and under two weeks i was totally free from Herpes. i want to say a very big thank you to DR Osaka for what he has done in my life. feel free to leave him a message on email drosakaherbalhome99@gmail.com or also Whats-app him +2349024827182.. he also cure all this 1.HIV 2.HIV HPV 3 .ALS 4.
ReplyDeleteشركة تسليك مجاري بالخبر U9a6mcSBhe
ReplyDeleteعزل فوم شقراء
ReplyDeleteybQhQfWZWJ
شركة عزل اسطح بالرياض
ReplyDeletepQ9B3zzyel
I was diagnosed as a Hepatitis B carrier in 2014, with early liver fibrosis. Antivirals helped at first, but resistance developed, and I lost hope. In 2020, I tried a six-month herbal treatment from NaturePath Herbal Clinic. To my surprise, I tested negative after completing it. This natural approach was life changing and may offer real hope to others with Hepatitis B.
ReplyDeletevisit: https://www.naturepathherbalclinic.com
شركة عزل فوم بالدوادمي
ReplyDelete7j6tjU6FUh
I was diagnosed with Idiopathic Pulmonary Fibrosis (IPF) four years ago, and despite prescription medications, my symptoms worsened. Out of desperation, I tried an herbal treatment program from NaturePath Herbal Clinic. Within a few months, my breathing improved, chest tightness eased, and I regained energy and stamina. It’s been life-changing I feel better than I have in years. If you or a loved one is struggling with IPF, I highly recommend their natural approach: www.naturepathherbalclinic.com
ReplyDeletenice designings
ReplyDeleteI'm so much grateful to herbalist Isaac for healing Fibroids and my genital herpes using his traditional medicine. I'm so much grateful to him! Y'all can check him out via his What'sApp on +234 707 696 3734 or email him on Drisaacherbscure2@gmail.com for more information. Also has remedies for HBP, HPV, HEPATITIS, PCOS, INFERTILITY E.T.C
ReplyDeleteMy God I'm so excited I can't believe Dr. Onokun could cure my cancer caused by HPV i had for 2year using healing herbs! This works like magic to me, I'm forever grateful He can also cure hsv and any kind of disease or virus. his website Onokunherbs.com or Dronokunherbalcure@gmail.com
ReplyDeleteDR Oyagu you are the best herbalist online no doubts. After using your herbal medication and getting cured I believed you for life and immediately my trust grew up more for you. I sincerely believe lots of people gonna despise you and blaspheme you for no reasons but they don’t know what they’re missing. You’re a powerful healer of herpes. You be my doctor forevermore for life. I rest my case .contact Dr Oyagu on his Email: oyaguherbalhome@gmail.com or via WhatsApp +2348101755322
ReplyDelete