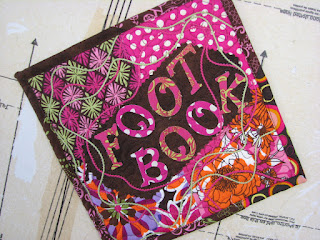
It's time for you to start exploring the feet that come with your machine. And what better way than to create a Foot Book. A Foot Book is a book that has pages dedicated to particular feet. You'll test out feet, stitch up some samples demonstrating techniques, then sew those into your pages. The final size is about 9" x 9" (or so...it doesn't really matter - mine is about 8 1/2" because I cut it too small!)
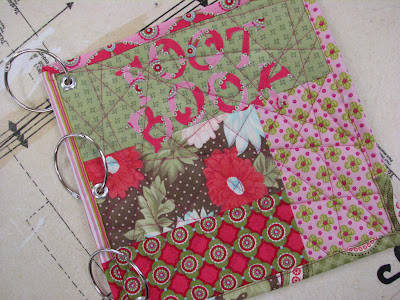
Here is a Foot Book cover, complete with grommets and rings, made by one of my Foot Book Club members. The cover was pieced; the words "Foot Book" were created from a die cutter and fused on. She made a quilt sandwich, did a little freemotion stitching, and finally used a couching foot to stitch on some embroidery floss.
Once she was happy with the design, she cut it down to size and added a faux piped binding. For the back cover, she made a pieced block, made a quilt sandwich, did some decorative stitching, and added binding. The last step was to add the grommets and book rings. She's now ready to add her sample pages!
Want to follow along? Periodically, I'll write about what we do in our Club meetings. I'll include some pictures and directions. So today it's all about the cover. Time to get creative!
1. Gather Supplies:
- Batting (this is 6oz batting - it's very fluffy! but makes for a nice cover because it will be stiffer). Grab whatever batting you have. Doesn't matter much. Cut it to about 10" square.
- Scraps of Fabric - this will be to piece your cover and to create whatever you want on the cover. If you don't want to piece it, use one piece of fabric. You'll also need binding fabric.
- Fusible Web - I used Heat 'n Bond Lite.
- A Die Cutter with Letters - to create the words "Foot Book" OK, you probably don't have one, you have some options.
- 1) Make a design on your computer and print it on fabric. I've used Dritz Printed Treasures.
- 2) Find a scrapbooking store where you can rent a die cutter (our local shop charges $5).
- 3) go to my Craftsy Pattern Shop and download my FREE FOOT BOOK cover. Print and trace onto fusible web; then fuse to fabric and cut out your letters! VIOLA! (If you don't quite get how to applique, please review this tutorial at Skip To My Lou - she even has some BIG letters that you can download!).
- 2" Book Rings - I got mine at Staples. They were in with the file folder stickers.
- Grommets and Pliers - I purchased the pliers and large grommets/eyelets at JoAnn Fabrics. You can get the Large or XLarge. The pliers only work for the Large. You'll need a hammer and the tool for the XLarge.
- OPTIONAL: Embroidery floss and a couching/cording foot. Don't know what a couching/cording foot is? Learn more here....
2. Piece Your Cover:
Using the fabric of your choice, piece your cover. The final size should be about 10" x 10". After you have quilted this, you'll cut it down to the final size of 9" x 9".
3. Create "FOOT BOOK":
I used a Sizzix Die Cutter to do this.
4. Make Quilt Sandwich:
I took my batting and sandwiched it between my cover and a piece of fabric (in pink) that will be the inside of my cover.
You may want to use some quilt basting spray to hold this together.
I wish I would have made my letters in plain fabric so they would have shown up better. Oh well!

5. Quilt as Desired:
I just sewed random straight stitches using my walking foot.
I increased my stitch length to a 3 to give it more of a topstitching look.
Once I was done, I cut it down to size: 9" x 9".
6. Add Binding:
I pieced the binding and attached it. My only problem was that the seams met up with the corners; this added some bulk and made turning the corners a bit difficult.I use a sharp pair of curved scissors to hold the binding as I sewed it. You can also use a stiletto.
Front View
7. Add Eyelets/Grommets:
I marked the back of my cover.
Cut the hole.
Insert the longer eyelet through the front.
Insert the stubby eyelet on the back - right over the stem of the eyelet.
Follow the directions and squeeze the pliers!
Done!
And you can see the bulky corner from the seam I created when I sewed the two pieces of binding fabric together.
Final Foot Book with Binder Rings!
When the mood strikes, I'll be adding pages. So check out "Foot Book Club" in the right column for more pages!


ROFL! I found the pattern and tutorial on Craftsy, but had to come over here to see what you meant when you said you belonged to a group of "foot lovers"! I thought to myself, "That can't men what I'm thinking?" OOOOhh! Sewing machine feet! Great idea, beacuse I havre lots of feet that I forget what their use is. Not sure if a rolling foot, a leather foot, a foot for slinky knits are the same thing. Still learning...
ReplyDeleteA little note to let everybody know about the powerful work of doctor chimnedum herbal home. My name is Gazalee from Malaysia and i was ones a HEPATITIS and HBP victim until i read about Dr chimnedum herbal home online on how he cured so many people with herbal remedies,and i contacted him for help and he really helped, after i applied his herbal remedies. i am testifying to this great Dr chimnedum herbal home because i want everybody to be informed so that you will contact him today for your cure, Contact him through: dr.chimnedumherbalhome1616@gmail.com Call/Whatsapp: +2347086675538,I'm healed,
ReplyDeleteis a great thing in my life today.
I was diagnosed as a Hepatitis B carrier in 2014, with early liver fibrosis. Antivirals helped at first, but resistance developed, and I lost hope. In 2020, I tried a six-month herbal treatment from NaturePath Herbal Clinic. To my surprise, I tested negative after completing it. This natural approach was life changing and may offer real hope to others with Hepatitis B.
ReplyDeletevisit: https://www.naturepathherbalclinic.com