Showing posts with label Learn to Quilt. Show all posts
Monday, January 6, 2014
SEW BAD: 14 Sewing Habits that You Need Break!
Last year, my most popular post was my review of 13 bad sewing habits (in honor of 2013). Now it's 2014, so I thought I'd add 14 more. Many of these are based on the comments that you, the reader, provided! So here we go...
(14) Sewing in the dark. When I first start sewing, I had amazing eye sight. Now I'm blind without my bifocals. For me, great lighting is a must. I'm lucky to have a sister who works for a cardiologist. When they got new beds (is that what they are called?), they got new floor lamps. But the floor lamps were those lamps that we ladies are quite familiar with...you know...not the ones a cardiologist would use. So I have an amazing Brewer Halogen 35 Exam Light! Use whatever works, but stop sewing in the dark!
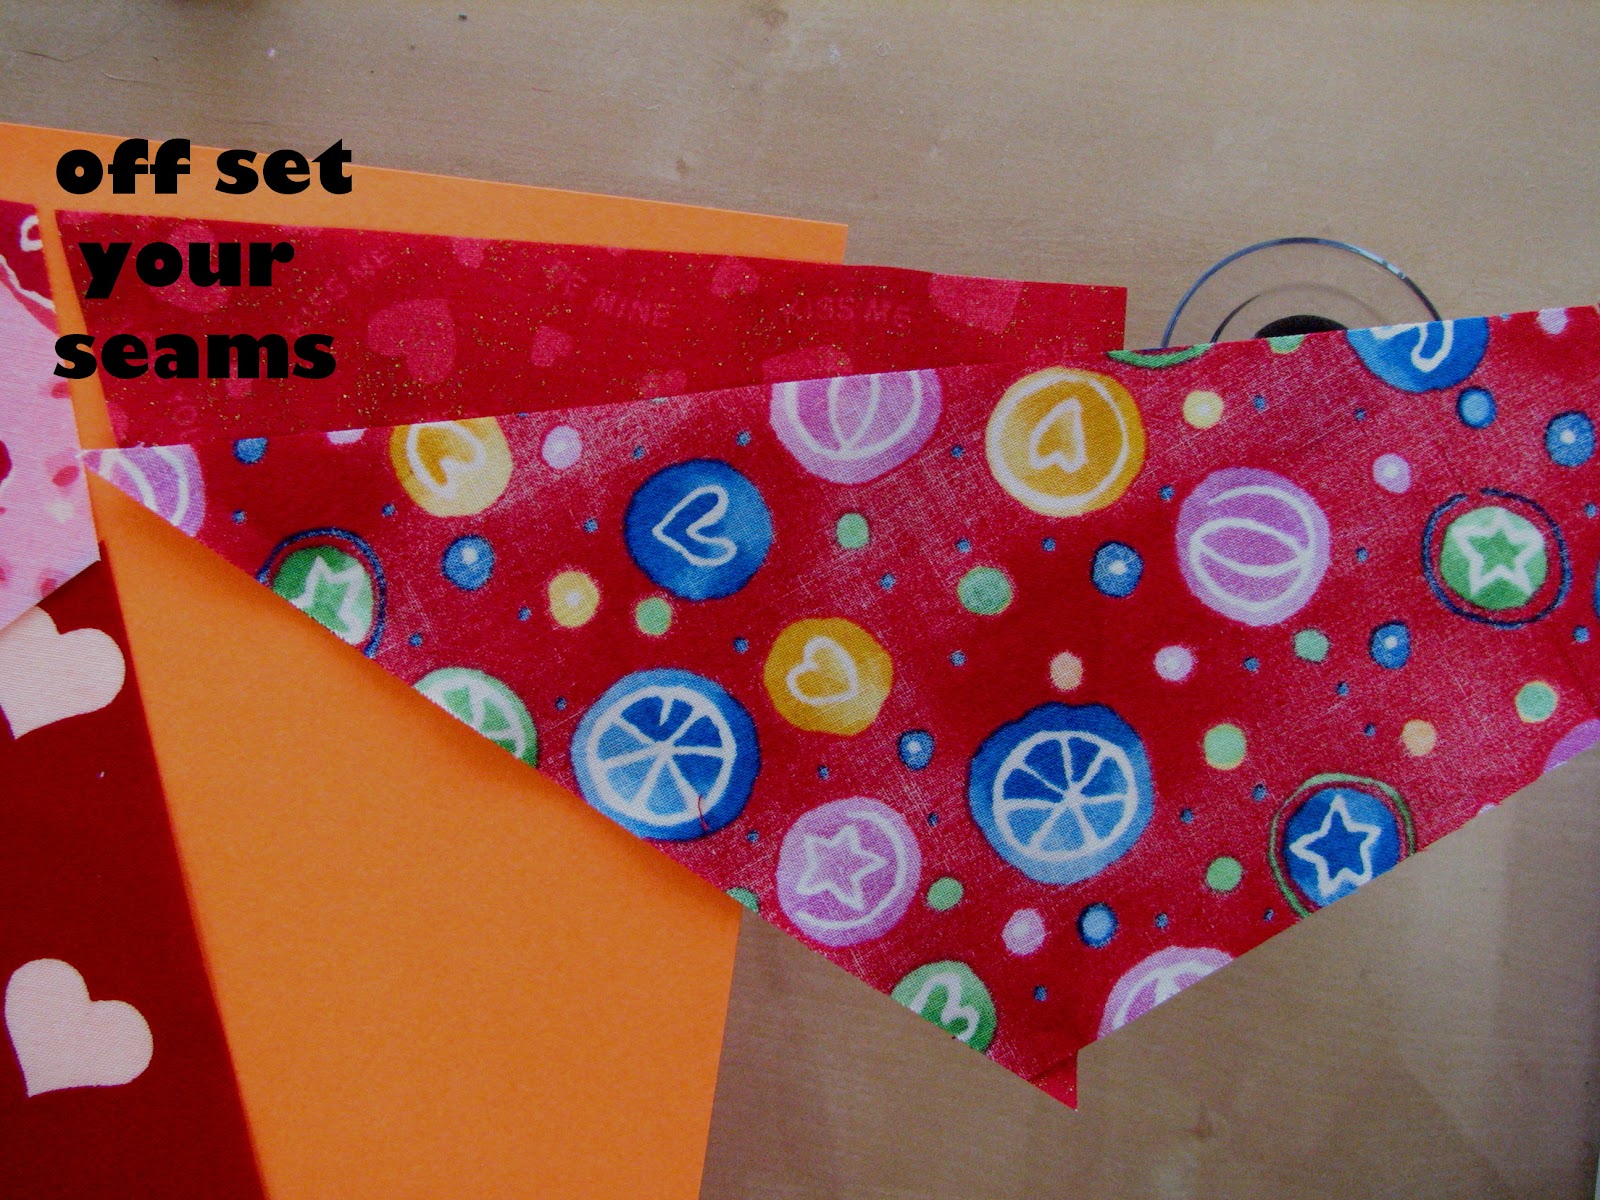
(13) Not taking the time to press properly. You might go too quickly, you might iron when you should press (and stretch the fabric), you might use steam when you shouldn't, you might use the wrong temperature...whatever the problem, please take time to press!
(12) Watching TV. I don't have a TV in my sewing room, but one of you mentioned that this was a bad habit - mainly because it's distracting. This is especially dangerous when slicing fabric with a rotary cutter! YIKES! And to be honest, I can't imagine watching Downton Abbey while I'm sewing!
(11) Being careless with your bobbin. One of you mentioned to be sure to thread your bobbin correctly. This is a tension issue - bobbins are wound and threaded in a particular direction for a reason. I've seen lots of bobbin problems: adding thread to a bobbin that already has thread on it (only wind thread on to an empty bobbin); winding the bobbin wrong (read your manual if you are in doubt), placing the bobbin in the machine in the wrong direction (again, check your manual). Also, for a drop-in bobbin, make sure the thread is inserted correctly. If I would get sewing quickly, the bobbin thread in my Janome would pop out of the tension and be all loosy-goosy. I could hear it happen!
And one more thing that a few of you mentioned...thinking that there is enough thread in the bobbin to finish a project. Ah, we all know it runs out with about 2" to go!
(10) Sewing while on meds. OK, I believe in sewing therapy, but there are times that we need to take some cold medication (or similar) that makes us drowsy. Probably not a good idea! Thanks to the reader who suggested this!
(9) Putting pins in your mouth. I rarely use pins, so this is not a problem for me, but, yikes....it's an accident waiting to happen. I love my magnetic pin holder. I have several of them. Get those pins out of your mouth! And speaking of pins, you really need to stop sewing over them - if hit a pin with your needle, you can jam that pin into your machine. You machine will hate you! =)
(8) Using a folding chair. My back is sore just thinking about this! I use an office chair - but I have a dedicated sewing room. For those of you sewing a the dining room table, make sure you are getting good support and that you are sitting at the correct height. This Sewlutions Guideline might help!
(7) Not taking breaks. I have a really bad habit of sewing for long periods of time. But sometimes it's just a good idea to take a break, especially when you are struggling. I stretch and go for a run on my treadmill. It clears my head and allows me to problem solve. Do what works for you!
(6) Not practicing new techniques prior to doing them. I'm a teacher who really believes in trying out new techniques. I've posted lots of tutorials in my Craftsy Pattern Store with the goal of helping you learn techniques - instead of being just a project sewer! So practice the technique prior to trying it on a project. Trust me...I've ruined a few projects because I thought I could figure it out.
(5) Being afraid of zippers. I know. I was there. My friend Caitlin sent me directions for installing a zippered pocket. I was totally freaked out and sat on it for about three weeks. I finally mustered up the courage, got out some scrap fabric and an old zipper, and tried. It was hideously wonky. But I quickly figured out what I was doing wrong. I tried again. Now I can't get enough of zippers. Go to my Craftsy Pattern Store to download some free zipper tutorials! BTW, I buy all my zippers at ZipperStop!
(4) Being afraid to make a button hole. It's all about practicing. Yes, the button hole attachment looks a bit intimidating, but dig out some scrap fabric and your owner's manual and start playing. I think you'll be surprised how simple it is.
(3) Storing thread out in the open. Yes, it's cute to hang thread on a peg board. My mom did that. In fact, I have a lovely pink peg board. But all of my thread is safely tucked away in drawers and jars. Why? Thread collects dust. That dust gets in your machine. I once wrote about this...
(2) Using pens to mark up fabric. And by pens I mean pens, like Bic. Use pens and markers designed for marking fabric - or you might permanently stain your fabric. I prefer water-soluble markers and small pencils. But you still need to test them. Even markers designed for fabric can stain!
(1) Guessing when you can look it up. The internet wasn't around when I learned to sew, but I was lucky to have a talented sister and mother who would answer my questions. Now I look things up. I watch YouTube videos. This Craftsy class looks great...40 Techniques Every Sewer Should Know. Sure, some of the techniques are for projects you won't make, but the techniques might help you with other projects. I never considered myself a quilter, but I use quilting techniques ALL. THE. TIME. on non-quilting projects!
Anything you'd like to add?
Thursday, January 3, 2013
Sew Bad: 13 Sewing Habits That You Need to Break
Saturday, November 24, 2012
Kicking Some Glass Quilt
Ok, so I started this quilt back in early August and it’s been clinging to my design wall ever since. I had purchased some charm packs (Free Spirit – Kaleidoscope) and, without any plan, started making half-square triangles. Then I sewed them together to make a square. Ugh. Boring. Too traditional. So they hung there, neglected, for almost four months.
I promised myself that I would work on this quilt over Thanksgiving. And that’s what I did. I had a bunch of blocks like the one to the left. In September, I bought some blue fabric and was just going to add some sashing and a border.
I cut a bunch of 3” strips and sewed them around the squares. Boring. Cut them wonky. Better. And here it is. I liked it but it wasn’t speaking to me. It was still too expected, which is not what I wanted. I did a load of laundry and came back…
….then figured it out. I cut each block in half along the diagonal and sewed them together in no particular order. Perfect.
I promised myself that I would work on this quilt over Thanksgiving. And that’s what I did. I had a bunch of blocks like the one to the left. In September, I bought some blue fabric and was just going to add some sashing and a border.
I cut a bunch of 3” strips and sewed them around the squares. Boring. Cut them wonky. Better. And here it is. I liked it but it wasn’t speaking to me. It was still too expected, which is not what I wanted. I did a load of laundry and came back…
Friday, August 17, 2012
Learning to Quilt
I'm back from a fun trip to Michigan! I spent some time with my family then headed to my friend's house for a few days of quilting (lessons). I was able to get one quilt completely pieced and another one almost finished. And my friend got her quilt almost completely pieced - she is making the Birthday Cake Quilt but decided to add some borders to make it bigger.
This is a great design for a beginner because (1) they can focus on the basics like cutting and the 1/4" seam, (2) it's goes together quickly, (3) there are no points/seams to line up, and (4) it's small enough to quilt with a regular machine.
I had to head back to NY before the binding was on...shucks! But here it is pieced and quilted. It was perfectly plumb! We quilted it with simple straight lines. The scrappy binding is made from the leftover block fabric; we did, however, replace some of the darker fabric with some more yellow so it wouldn't blend in.
Monday, July 16, 2012
Color Theory Website
Every once-in-a-while I come across a website that blows me away. It's unusual and inspirational. Today I found one - and it's a gem - Awesome Artists by "Mo" M.C.Gillis.
Friday, March 16, 2012
The Kwik Klip
In the big scheme of things, I'm new to quilting. I've only been at it for a few years. I usually make lap quilts - the largest one was 70" x 70." And my favorite part of quilting is the actual quilting. I got my start quilting purses and L-O-V-E-D free motion. Loved it. It is more difficult on a quilt, but I still don't send my quilts out -- or as my friend refers to it, "Quilt by check."
The tedious (and often painful) part of quilting is the pinning. That was until one of my sewing students told me about the Kwik Klip. Watch this video to see me pinning my brother's guitar quilt. I usually put a row of pins in, then come back with the Kwik Klip and close the pins. And it works so well that you don't need to lift/stretch the fabric to get the pin closed!
And you can get your Kwik Klip here!
Friday, March 9, 2012
It's Best to Press!
Whenever we head to the ironing boards during my classes, I usually have to remind my newbies to press rather than iron. Because most of us iron our clothing (and hate it!), we attempt to do the same thing with fabric. We iron...because it's fast and we want to get it over with. But there is a difference! When we sew and quilt, it's best to press!
Pressing: this is when you take the iron, put it on the fabric, hold it there, lift, move to another area, place the iron down, hold it there, lift, move to the next area, and so on. You press one area at a time.
Why Press? The problem with ironing is that the pressure and movement distorts the fabric and makes the fabric wonky. How so? The threads that make up fabric are woven in straight lines; when you iron, you push those threads all out of whack. So when you cut it, it looks fine; when you sew it looks fine; but when you wash the item and the fabric straightens itself back out, it doesn't look so fine. Then you have weird bumps and such. My friend who quilts refers to those bumps in order of severity: A cups, B cups, C cups...I think you get the point.
If you really struggle with wrinkles, use starch. And to make it even easier, remember that the heat from the dryer bakes in wrinkles, so when you wash the item or fabric, take it out of the dryer when it is damp and hang it.
Happy pressing!
Wednesday, March 7, 2012
Crazy Quilt Block
My first experiment with quilting began in the crazy arena when I saw this technique on a television show. I loved that nothing really needed to line up. For me, it was the perfect place to start my quilting journey. So here is a simple technique for creating a crazy quilt block. The final block size is 8 1/2".
1. Get Fabric: Start with five different 10" squares of fabric. You can use a layer cake if you'd like. These are just some scraps that I had.
Get ready to cut your fabric; you'll be making one less cut than to the total number of pieces of fabric. So, I have five pieces of fabric and will be making four cuts. If I had four pieces of fabric, I'd make three cuts.
You now have two pieces/sections.
4. Cut again: take one piece and make your second cut. It doesn't need to be exactly like this!
5. Make your third and fourth cuts.
I made four cuts and end up with five pieces. The five pieces represent the five fabrics you started with.
6. Re-stack the fabric:
Take the top piece from stack 2 and place it on the bottom of stack 2.
It should look like this.
7. Stack Again! Take the TOP TWO pieces from stack 3 and place them on the bottom of stack 3.
It will look like this!
8. And Again! Take the top THREE pieces from the next stack and place them on the bottom.
Then take the top FOUR pieces from the next stack and place them on the bottom.
9. Done! You'll end up with five blocks (layers) that are all mixed up. But there is a correct order, so don't start moving them just yet.
10. Separate Layers: Take each layer and separate them into your five blocks. You will have one piece of each fabric in a different spot on each block.
I put a piece of paper under each set so I could easily carry them to my machine to piece. This helps me keep things sorted.
11. Sew Together:
Sew 1 to 2 and then 2 to 3.
Then sew 4 to 5.
You'll have two parts.
You will want to off-set your seams about 1/4" so the edges of the fabric line up more closely. They won't be perfect.
12. Trim your edges: you'll be sewing this to the 4/5 pieces.
13. Trim your other edge. It should look like this - nice and clean!
And one piece is a little bigger than the other - not a problem.
14. Sew together.
15. Square it up! I used an 8 1/2" square ruler.
And here are the completed blocks.
You can take it from here! You can make a quilt or sew these together, quilt, and make a tote or purse.
Here is my very first crazy quilt.
Thanks for stopping by! As a gift, here's a free pattern for a round, zippered pouch. It's easy to make...you don't have to cut circles!
UPDATE: I've added some information on other cutting options!
Wednesday, February 29, 2012
Learn to Sew: Thread
Last week, I had a reader ask a question about thread. So I thought I'd expand on my reply. Thread (along with needles) are a very important but often overlooked part of sewing.
First of all, if you live near a fabric shop (not a chain/big-box store), talk to them. They know their brands and can recommend the best thread for your project. Most fabric shops cater to quilters who typically use 100% cotton thread; if you are making clothing, home dec, or accessories, cotton thread may not be your best choice. BUT...they can help you with that.
But I'm guessing that, if you are reading this, your shopping is limited to Joann Fabrics, Hancock Fabrics, Hobby Lobby, etc. They carry popular, mass-marketed brands and a limited supply of specialty threads. And it may be overwhelming when you first glance at all those spools. Here is the low-down on thread that you'll probably find at those stores - I'm keeping it simple:
Embroidery Thread |
2. Bobbin Thread: While you are looking at embroidery thread, you'll see bobbin thread. This is thread for an embroidery machine and to be used for machine embroidery. It's super fine and not designed for construction. It typically comes in two colors: white and black.
![]() |
Serger Thread |
Upholstery Thread (Black) and Top-Stitch Thread |
4. Upholstery and Top-Stitching Thread: Although these are different threads, you'll run into the same problem: they are thick. Threads come in different weights - the smaller the number, the thicker the thread. Most regular sewing thread is a 50 wt. Embroidery thread is 30wt to 40wt and so is upholstery and top-stitching thread. You can see this when you look at the thread....it just looks thick. So when you sew with this, it's adds bulk to your seams; plus it's often nylon...ick. Plus, you need a different needle to accommodate the thicker thread.
Monofilament Thread |
5. Invisible/Monofilament Thread: You may not see this (ha! get it?!), but there is such a thing as invisible or monofilament thread. This polyester or nylon thread is designed to NOT be seen. It's not for construction, instead you'd use it for quilting when you don't want to see your stitches. It comes in different sizes (thickness) and can be tricky to work with.
![]() |
Metallic Thread |
7. Glow-In-The-Dark Thread: Again, totally cool for decorative stitching, but not for construction. BTW, it really glows in the dark. It's great for applique on a Halloween tote bag!
![]() |
Cotton Machine Quilting Thread |
![]() |
All-Purpose Thread |
So there you have some of the basics of thread. There is A LOT more out there. To see a close-up of different thread (and better understand quality), please check out this article, complete with pictures!
Labels:
Finishing Touches,
Learn to Quilt,
Learn to Sew,
Notions
Thursday, February 23, 2012
Beginning Quilting: Color
![]() |
Thistled Tones from Design Seeds. |
Learning to quilt can be a little overwhelming...with all those pieces of fabric...and rulers...and thread...but it can be even more mind-boggling when you throw in fabric and color selection. I consider myself a bit of a risk-taker with color -- and I have had some disasters. But I recently came across this AMAZING website that offers readers color palettes. WOW...find something that you like and head to the fabric store. I think it's become my new addiction. So please check out Jessica at Design Seeds. Wow. Wow...It's hard to pick a favorite, but for now I'll go with Thistled Tones.
Thursday, February 16, 2012
Beginninng Quilting: Simple Quilt Project
Here's my work-in-progress up on the design wall. I'm making mine bigger than what's instructed on the pattern.
The fabric is Basic Grey: Blush. This is a Fons and Porter Quilt Design Wall, but Elizabeth Hartman has a great tutorial on making a design wall.
I used to draw diagonal lines but recently switched to a Sew Easy Guide from Sew Together. Visit their website for some great videos on using this tool.
And a quick word about the Fons and Porter Quilt Design Wall. The reviews on Amazon are negative. I have four of these and love them! The only problem I've had is that the grommets can come off. But I just sew a button hole in place of the grommet. I've tried flannel-backed table cloths but many of them don't have enough "flannel" to make the fabric stick. If you decide to buy your own, table cloth pads (that go under a fabric table cloth) work really well. They are thicker. I got mine at Target.
Wednesday, February 8, 2012
Freemotion Lesson: Practicing
Freemotion stitching can be a bit intimidating - I've seen that horrible look of fear when I teach this class. But after multiple lessons and lots feedback, I found something that worked - and took some of the fear away. When you are teaching yourself freemotion:
- Make a quilt sandwich out of old fabric or muslin. The sandwich should be about 20" x WOF. One side will be the selvage and the other will be the fold. Tuck the batting in between. Spray with basting spray.
- Take a Sharpie and draw lines that are about 1 1/2" to 3" apart.
- Remove all the thread (none...nothing in the bobbin, either). This will allow you to focus on the motion part; you won't get worried about the thread tension, the look of your design, the consistency of the length and distance between your stitches. Just play with the movement.
- Make a zig-zag pattern -- start at the bottom right hand side and move from the right line to the left line, then back to the right and so on until you are at the top. Then come back down. And yes, it is often more difficult to push the fabric away from you than it is to pull the fabric toward you.
- When you are comfortable with the movement, add thread. You may have to adjust your tension a bit. And you may have to get a different needle (want to learn about needles? Check out the Schmetz Learning Center. If you really have trouble, change thread. Yes, you can try to figure out why that thread doesn't work, but why bother? Just change your thread.
- As your comfort level grows, try different designs. Need inspiration? Try the Free Motion Quilting Project! Use the lines to help you focus a bit (look at where you are going...then back at the needle...then where you are going...etc). Go in and out of the lines, so you don't create a path or runway look.
- When you are really ready, check out Elizabeth Hartman's tutorial on Free-Motion Quilting.

Also, don't forget to drop your foot! Because of the puffiness of the quilt sandwich, you may THINK your foot is down. If it isn't, you'll have big loopies on the back of your quilt sandwich.
Thursday, January 26, 2012
Cutting and Making Bias Strips
A little baffled by bias binding? This is a great tutorial from Cindy and Jina at Riley Blake Designs. They show you how to fold the fabric to make cutting easier; then you'll get a quick lesson in sewing the strips together!
One thing, though, I don't recommend her ruler placement - I'm a from the school of "put the ruler over the piece you want." So I would use the marks on the ruler to cut the bias strips.
Wednesday, January 25, 2012
Fabric Woes: Puckering
In my Beginning Quilting: The Basics class last night, one of my students was struggling as she sewed two different weights of fabric together - one was stiffer/heavier and one was softer/lighter: the softer one puckered. This resulted in uneven seams and wonky blocks. We put in a new needle, adjusted the tension, slowed down...nothing worked. Then I got out the spray starch. We got the softer fabric pieces out and sprayed (then pressed until dry) and sprayed again. The starch stiffened up the softer fabric so it would feed evenly with the other fabric. VIOLA! Problem solved!
Here is a great article on starching quilt fabric from Generations Quilt Patterns; it includes directions on making your own starch!
Tuesday, January 10, 2012
Beginning Quilting Class
I teach my first Beginning Quilting: The Basics class tonight! The class is full - with six enrolled! YAY! Tonight we'll be reviewing quilting basics and cutting fabric.
Subscribe to:
Posts (Atom)