


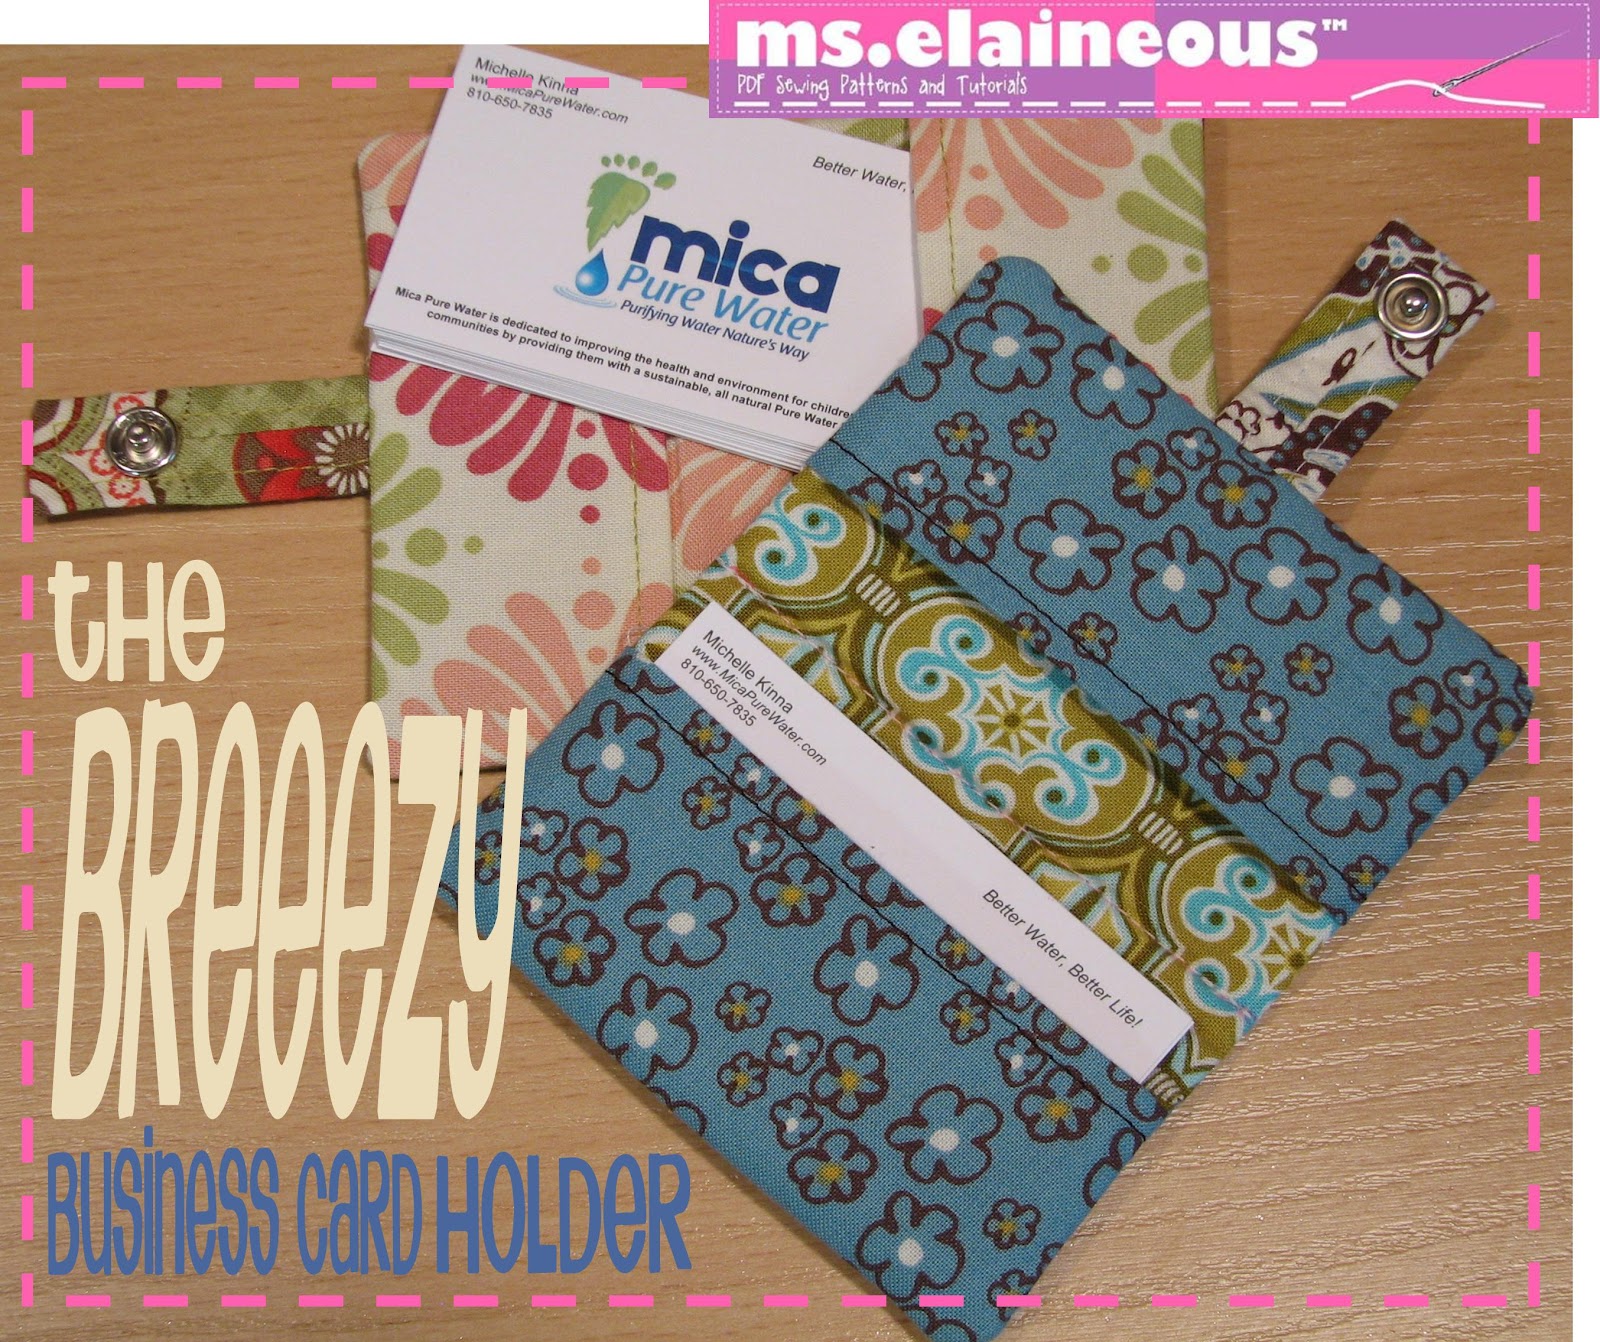
I thought I'd do a follow up to the Sew Write Composition Book Cover with this cute and easy business card holder. You'll use the same technique...which is why it's a breeeeeeeze!
SUPPLY LIST:
- Fabric Scraps
- Interfacing: Fusible Fleece and Lightweight Fusible
- Size 16 Snap
- SnapSetter Tool
- Turn-it-all Tool

CUT FABRIC AND INTERFACING:
- 1 - 5 1/2" x 4 1/2" of the Exterior Fabric
- 1 - 4 1/2" x 4 1/2" of the Lining Fabric (the fabric behind the pockets)
- 2 - 4 1/2" x 4" of the Pocket Fabric
- 1 - 2" x 2 1/2" of the Tab Fabric
- 1 - 5" x 4" of Fusible Fleece (for exterior)
- 2 - 4" x 4 1/2" of Lightweight Fusible (for pockets)
- 1 - 2" x 2 1/2" of Lightweight Fusible (for tab)
 FUSE:
FUSE:
Fuse fleece to the WRONG side of the exterior fabric following manufacturer's directions. It will be a 1/4" smaller all the way around. This reduced bulk in the seams.
Fuse lightweight interfacing to the wrong side of the pockets and the tab.

Press pockets in half, wrong sides together, so they are 4 1/2" x 2".
OPTIONAL - topstitch close the folded edge for a more finished look. Whenever I topstitch, I increase my stitch length to 3mm.
 START SEWING!
Make the tab:
Fold tab in half, right sides together (RST), so it is 1" x 2 1/2". Using a 1/4" seam, sew the open edge closed...yes, just that one side.

Press flat so the seam is in the middle. I used a small chopstick to help me hold it!
Using a 1/4" seam, sew ONE of the open ends closed.
Clip seam to about 1/8" and, using your Turn-it-all, turn it right side out and press flat. If you don't have one of these tools, you'll want to buy one. Really. Buy one. Genius.
OPTIONAL: topstitch around three sides of the tab, pivoting at the corners. Just start at the open end and work your way around!

Mark snap placement: On the fleece side of the exterior, mark 2 3/4" in from the 5 1/2" side and about 1 1/4" in from the 4 1/2" side. This is will be the front of the b.c. holder -- so pick the nice side!
SNAP TIME! Place the silver prong open ring over the mark so the prongs poke through to the exterior.
Flip over so it's right side up. Using your Snapsetter Tool (another must for every sewing room), attach the socket to the prong.

Place the exterior right side up. Place the tab in the middle of 4 1/2" side that does NOT have the snap. The seam of the tab should be facing up.
Baste tab in place using about an 1/8" seam (anything less than a 1/4" is fine).

With exterior right side up, place pockets on as shown. Line them up along the sides and top/bottom.
If you'll notice here, I cut my pockets too small and had to add to them. That's what I get for trying to do this ... in my basement ... during a tornado warning.
Baste pockets in place using about 1/8" seam.

With exterior right side up, place lining right side DOWN on top - sandwiching the pockets and the tab.
Because the lining is smaller, you will have about a 1/2" open, exposing the pockets...this is how you'll be turning this right side out!
Using a 1/4" seam, sew ALL THE WAY AROUND. If it's a bit wonky, sew with the fleece on top.
Carefully clip corners. Turn right side out using the opening/lining. If it looks a bit odd, you may have to flip the pockets around!
Press flat.

With lining right side up, mark a line that is 3/4" in from the pockets. This should be in the middle...between the two pockets.
Sew directly on that line.
TIP: to hide your starting and ending threads - start about 1/2" in from the edge...take a few stitches, back stitch to the edge, then sew all the way down to the other edge...then back stitch about 1/2" and clip - this buries your threads in your stitches!
Using your Snapsetter Tool, attach the stud/decorative snap to the tab. Make sure the pretty side of the snap is on the outside/unseamed part of the tab! You may want to put some business cards, close it, and wrap the tab around so you can mark the tab snap where you want to place it.

DONE!! YAY...another super easy project brought to you by Ms.Elaineous!
OTHER IDEAS:
Are you a bit of an Anglophile? Then check out this needle holder from Make It Do...you could use the same concept for this business card holder!
Are you a bit of an Anglophile? Then check out this needle holder from Make It Do...you could use the same concept for this business card holder!
If you don't use business cards, you could make these to hold all of your loyalty cards and/or gift cards!
Add a ring holder so hang keys on! It's perfect for a college student - it will hold and ID card along with a room key!
A FEW OTHER THINGS...
And about that tornado. We just had rain and wind but my sewing friends in Elmira (20 miles east of Corning) weren't so lucky. A tornado touched down and caused damage to several homes. But they are safe now and crews are working to get things back to normal!

This comment has been removed by a blog administrator.
ReplyDeleteThis is such a great resource that you are providing and you give it away for free. I love seeing websites that understand the value of providing a quality resource for free. It is the old what goes around comes around routine. Maquininha UOL Pag Seguro
ReplyDeleteThank for writing this post. Looking forward to read more.
ReplyDeleteBusiness Card Holder Wholesale
A little note to let everybody know about the powerful work of doctor chimnedum herbal home. My name is Gazalee from Malaysia and i was ones a HEPATITIS and HBP victim until i read about Dr chimnedum herbal home online on how he cured so many people with herbal remedies,and i contacted him for help and he really helped, after i applied his herbal remedies. i am testifying to this great Dr chimnedum herbal home because i want everybody to be informed so that you will contact him today for your cure, Contact him through: dr.chimnedumherbalhome1616@gmail.com Call/Whatsapp: +2347086675538,I'm healed,
ReplyDeleteis a great thing in my life today.
Hi Bia, I'm looking forward to making this but not sure I understand that part where the lining is added. It says to sew all the way around...are you sewing on the sides too? But since the lining is shorter, those won't get sewn? Is the lining left with raw edges?
ReplyDeleteThanks,
Sarah
This business card holder looks easy and stylish.
ReplyDelete